Introduction #
We are all aware of how vital a positive user experience is for businesses of any kind. Your role as an Online Store owner is to ensure the convenience of your visitors. Fortunately, WooCommerce comes with great built-in features that will allow you to easily configure your settings. In this guide, we are going to walk you through the “Account and Privacy” settings which when configured will promise satisfying customer experience. In case you are ready – let’s jump in!
Getting Started #
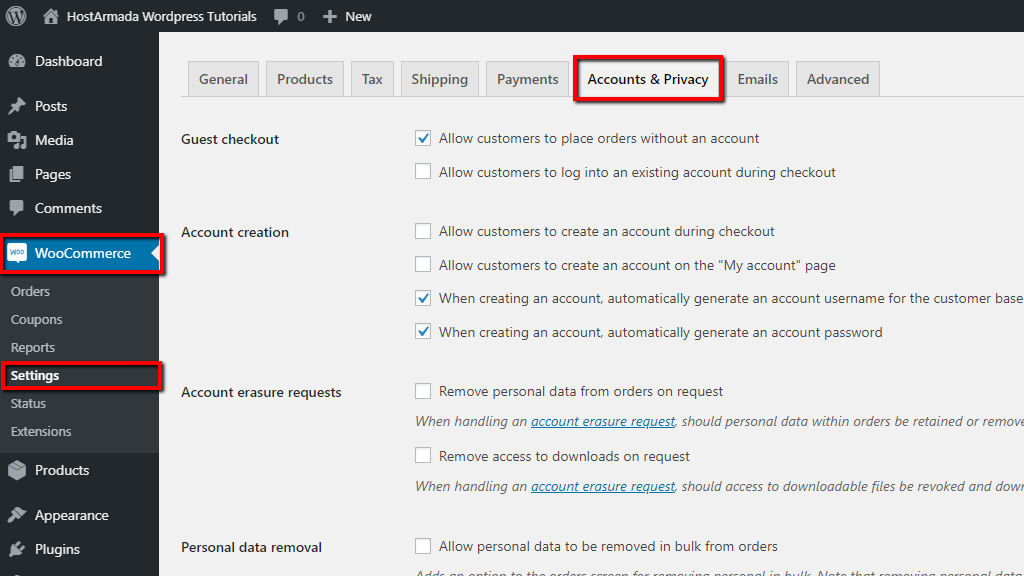
In order to begin, please first log in to your WordPress Admin Dashboard and navigate through the left menu bar to WooCommerce > Settings and then switch to the “Account & Privacy” tab from the top menu bar.

You will notice that the “Account & Privacy” tab is divided into three main sections that will allow you to configure your account settings, Privacy Policy settings, and data retention settings.
Accounts Settings #
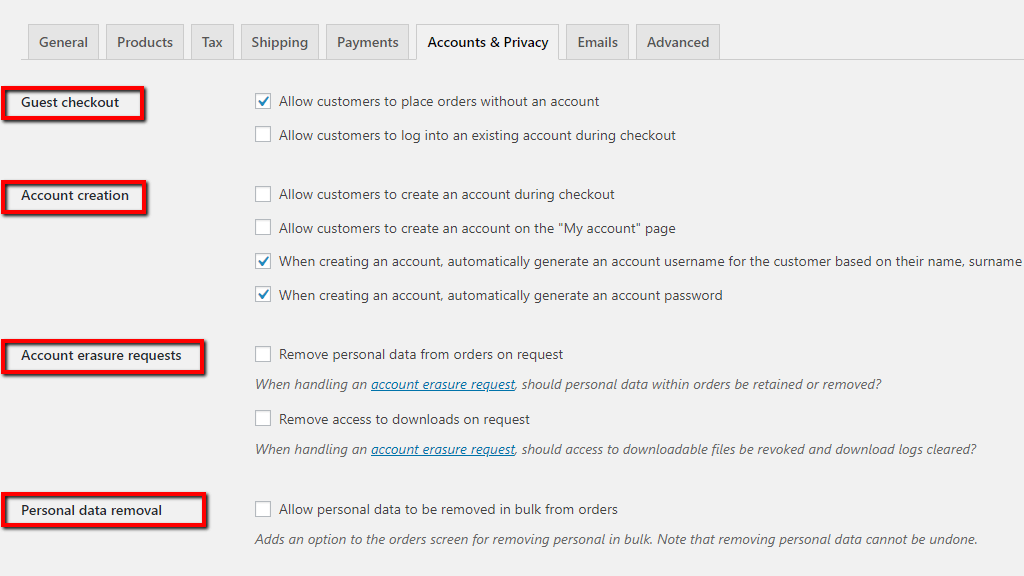
Now, let’s move forward and stroll through each of the settings one by one. First, we will cover the account settings section where you will have to configure the following four options.

Next, to the “Guest Checkout” setting, you will notice two options that will include useful functionalities in your store.
- Allow customers to place orders without an account – Enabling this option will NOT require your visitors to create accounts in order to purchase your products. Please note that orders submitted from guest visitors will not be associated with a user account.
- Allow customers to log into an existing account during checkout – Enabling this option will present a login form suggesting to your customers to log in to their accounts during checkout.
From the “Account creation” setting you will be able to decide whether you would like to enable or disable the following options:
- Allow customers to create an account during checkout – This option will display a registration form on your checkout page providing your visitors with the option to create an account.
- Allow customers to create an account on the “My account” page – This option will allow your customer to create an account under the “My account” page providing them with an easy place to register.
- When creating an account, automatically generate an account username for the customer based on their name, surname or email – If enabled, this option will automatically generate a username upon account creation. If you disable it, an additional field will be prompt to your visitors where they can create their own username.
- When creating an account, automatically generate an account password – If this option is enabled password will be automatically generated and sent to your visitors via an email. If disabled, your visitors will be presented with a “Password” field where they can enter their own password. Please note, that even though a password strength alert will be displayed, your visitors may ignore it and still select an insecure password.
The “Account erasure requests” setting allows you to configure your data removal preferences.
- Remove personal data from orders on request – If you enable this option when deleting your customer’s personal information it will be also erased from the orders belonging to the given customer.
- Remove access to downloads on request – If you enable this option when deleting your customer’s personal information it will also erase the download data associated with the given customer. Those customers will no longer have access to purchased downloads.
And the last setting under this section – “Personal data removal” will allow you to enable the following option:
- Allow personal data to be removed in bulk from orders – If you tick the checkbox, new functionality will be added to your “Orders” page which will allow you to remove personal data in bulk.
Privacy Policy #
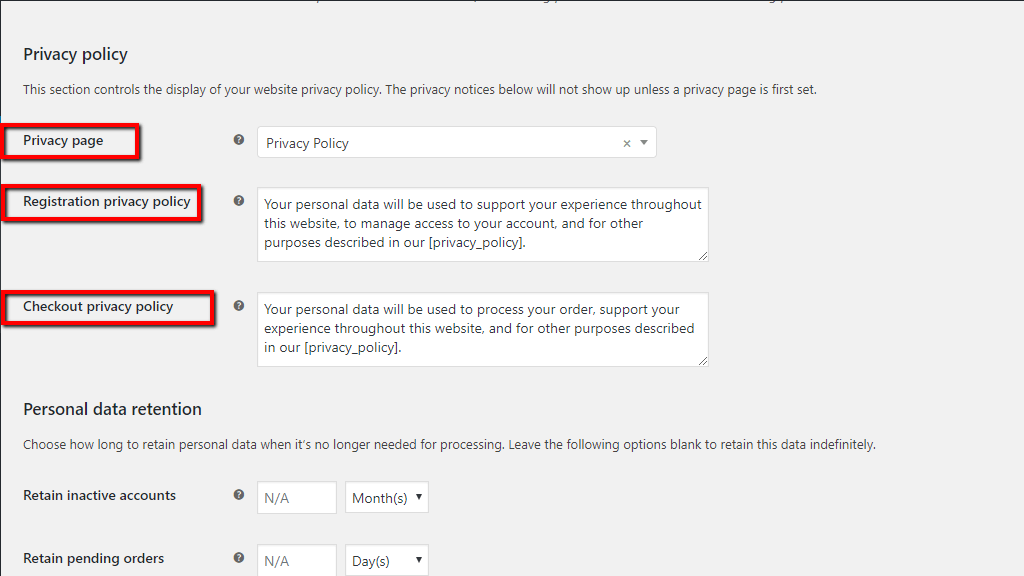
Under this section, you will find three settings which will allow you to control how your Privacy Policy and Privacy notices are displayed on your website.

From the first “Privacy page” you will have to select a page that will serve as your Privacy Policy. As you will notice the default WooCommerce “Privacy Policy” page is pre-selected, however, if you wish to configure another page feel free to select it from the dropdown menu.
In the second “Registration privacy policy” option, you can enter a custom text in regards to your Privacy Policy and how you handle personal data, that text will be displayed on your registration form. As you will notice there is already a default WooCommerce text, but you can always put your creativity to work and replace it with your own. If you use the “[privacy_policy]” placeholder it will be linked to your “Privacy Policy” page.
Similarly to the previous setting, the text entered under “Checkout privacy policy” will be displayed on your checkout page.
Personal data retention #
The settings you will find under this section will allow you to control how long your customer data will be kept under your Online Store before deletion. It is strongly recommended to consider consulting with a specialist in order to ensure you are in compliance with specific local regulations.
As you will notice each of the options appears with two fields where you will need to specify a number and duration for the data retention period. Leaving the fields blank will disable the options.

- Retain inactive accounts – Accounts with no recent login activity and no previous orders placed are considered as “inactive accounts“.
- Retain pending orders – Orders with no payment applied are considered as “pending orders“.
- Retain failed orders – Orders with no payment applied or abandoned orders are considered as “failed orders“.
- Retain cancelled orders – Orders intentionally cancelled either by you or by your customers are considered as “cancelled orders“.
- Retain completed orders – Orders successful paid and processed are considered as “completed orders“.
After you ensure all your settings are set up as you desire, please do not forget to click on the blue “Save changes” button in order to keep your preferences recorded.
We would like to congratulate you on learning how to take control over your “Account and Privacy” settings and properly managing your Online Store. We hope you found our guide useful and easy to follow, in case something was not entirely clear or you ended up experiencing any difficulties, please do not hesitate to reach out to our Support Team in order to discuss the matter.


