Introduction #
Interaction between a website owner and its visitors is of primary importance. Therefore, you, as the site admin, need to ensure the possibility of smooth communication and a welcoming overall experience. In addition, by controlling your settings you can reduce the spamming activities on your website comment sections.
In this tutorial, we will be focused on the Discussion settings, which will allow you to manage the commenting on your website posts and pages.
Getting Started #
For a start, please log into your WordPress Admin Dashboard. You can do that by accessing your domain followed by “/wp-admin“, i.e., “yourdomain.com/wp-admin“, where “yourdomain.com” stands for your actual domain name.
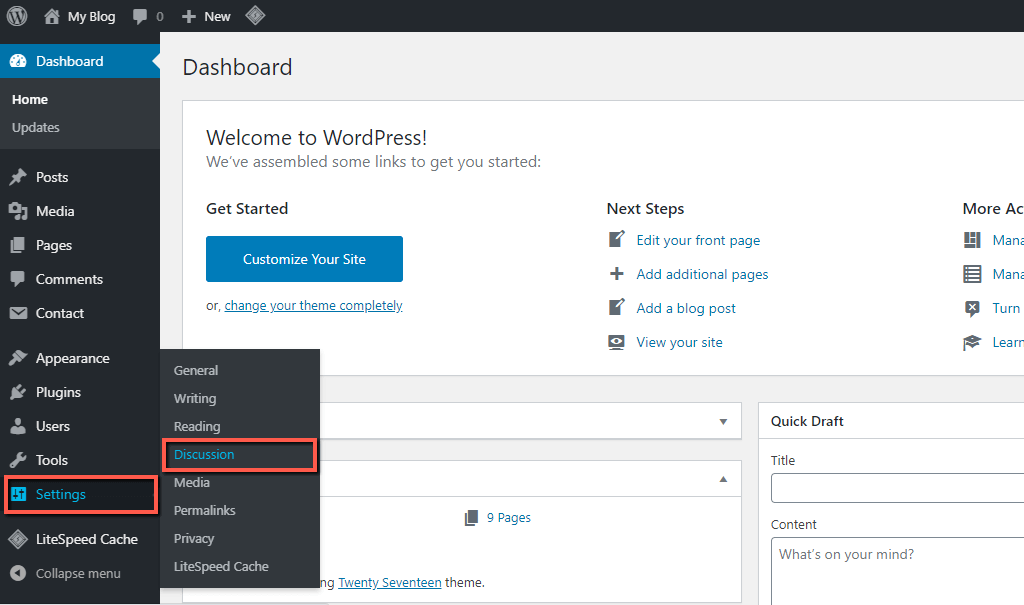
Once logged, please navigate through the left-hand side menu bar to Settings > Discussion.

Upon doing that, you will be redirected to the “Discussion Settings” section, where you can start the configuration.
Configuring Discussion Settings #
Now that you are on the intended page, let’s review all the settings and alter them with the intention to your individual preferences.
Default Post Settings #
The settings within the first “Default post settings” section are going to be considered as default for your new posts, but they might be overridden for individual posts.
- Attempt to notify any blogs linked to from the post – If enabled, WordPress will attempt to send a ping to all sites linked in your post upon publishing it. If these sites allow pingbacks or trackbacks, your mention will appear in the commenting section as a pingback or a trackback.
- Allow link notifications from other blogs (pingbacks and trackbacks) on new posts – This is pretty much the opposite of the first setting. If your site is linked in a post of another website, and pingbacks and trackbacks are allowed on yours, the pingback or trackback is going to appear in the commenting section linking to the origin website.
- Allow people to submit comments on new posts – This is pretty self-explanatory – it controls whether visitors will be allowed to comment on all your posts. As we previously mentioned, you are able to override the settings on per post basis. In addition, you can make a post private and require an initially defined password to grant permission for commenting.

Other Commenting Settings #
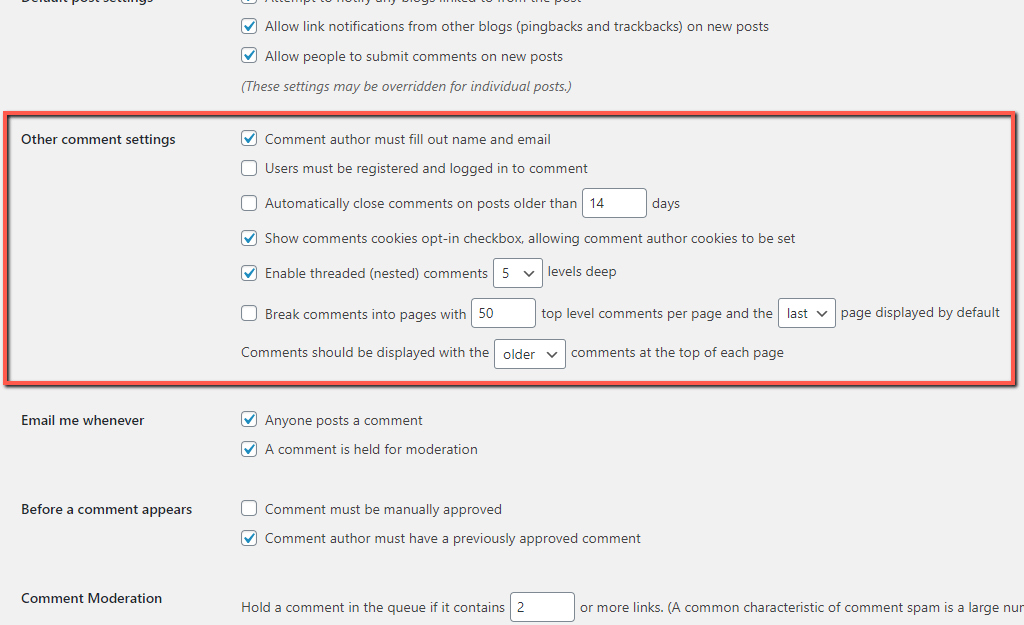
As the name of the section suggests, under it, you will find settings allowing you to control the commenting on your posts.
- Comment author must fill out name and email – This checkbox lets you control whether the name and email address fields to be optional or required upon submitting a comment.
- Users must be registered and logged in to comment – If thicked, your visitors will be required to be existing users, logged into their accounts, in order to be able to submit a comment.
- Automatically close comments on posts older than – If enabled, this setting will automatically disable commenting on posts older than the value specified within this field. This could be a good practice to reduce spam comments on your website. Anyhow, it is a matter of personal preference.
- Show comments cookies opt-in checkbox, allowing comment author cookies to be set – When enabled, this setting will display a checkbox to your visitors, allowing them to save their name, email, and/or website, so the next time they want to comment, these details will be pre-filled.
- Enable threaded (nested) comments – When this checkbox is ticked, your users will be allowed to reply to other comments. The value determines the number of times a particular comment can receive a reply. So, the default 5 value, will allow 5 replies to any given comment.
- Break comments into pages – If this checkbox is ticked, the comments will be displayed on separate pages. In case you decide to enable it, you have to specify three more details. First – how many comments to be shown per page, second – which page to be initially displayed, and third – which comments to be displayed at the top. If comments are often submitted on your posts, you may consider enabling this setting and splitting them into a few pages. Note that each comment initiates a request to the database, and having lots of comments may reflect negatively on the page loading speed.

Email Notifications and Comment Approval #
Within the following “Email me whenever” section, you can control what events will trigger email notifications sent to you.
- Anyone posts a comment – Determines whether an email notification is triggered every time a comment is submitted on your website.
- A comment is held for moderation – A comment held for moderation needs to be manually approved, which is a good practice for filtering spam comments. When this setting is enabled, you will receive an email notification every time such a comment is posted on your website.
In the “Before a comment appears” section, you can control the requirements for publically publishing a comment.
- Comment must be manually approved – If you tick this checkbox, you will need to manually approve any comment posted on your website before it becomes publically visible.
- Comment author must have a previously approved comment – When enabled, comments submitted by users who have previously approved comments will be automatically published on your website, making your job as an administrator easier. Considering the fact, they have previous comments means that those are trusted users who are less likely to be spammers.

Comment Moderation and Comment Blocklist #
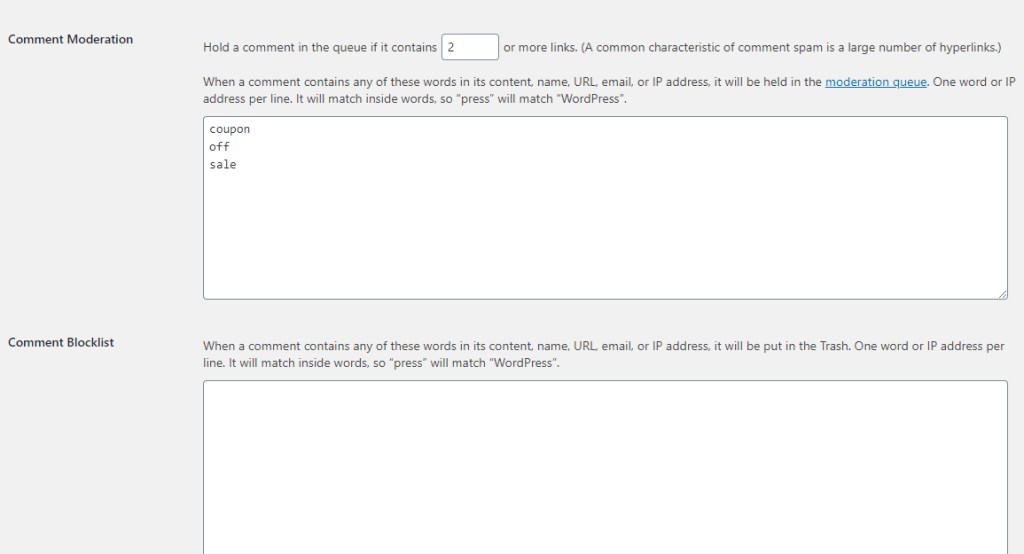
Within the following two content boxes, you can define forbidden phrases, emails, URL addresses, and IP addresses.
- Comment Moderation – A common spam practice is to include several URL addresses in a comment. Therefore, WordPress allows you to define the number of allowed URLs in a comment. Within the field, you can enter the value, which will mark comments containing that number of links for manual review and moderation. Within the content box, you can define phrases, URLs, emails, and IP addresses (one per line), which will trigger a commend and hold it for moderation if detected.
- Comment Blocklist – This works pretty much the same – you can define particular phrases, URLs, emails, and IP addresses, by entering one per line. The main difference is that such comments will be automatically marked as spam.

Avatars #
This section allows you to enable and configure the visitors’ avatars that appear in the commenting section. By default, WordPress is using Gravatar, where users can create their avatars. If the email connected with their Gravatar account is assigned to the comment, WordPress will automatically display their avatar. If a user does not have an avatar, the default avatar will be displayed instead.
- Avatar Display – This option is enabled by default, meaning that a little icon will appear along with each visitor’s comment.
- Maximum Rating – This setting determines how appropriate the avatar icon is for a particular audiance. It allows you to control which avatars to be displayed or not based on their gravatar’s “highest” level or rating.
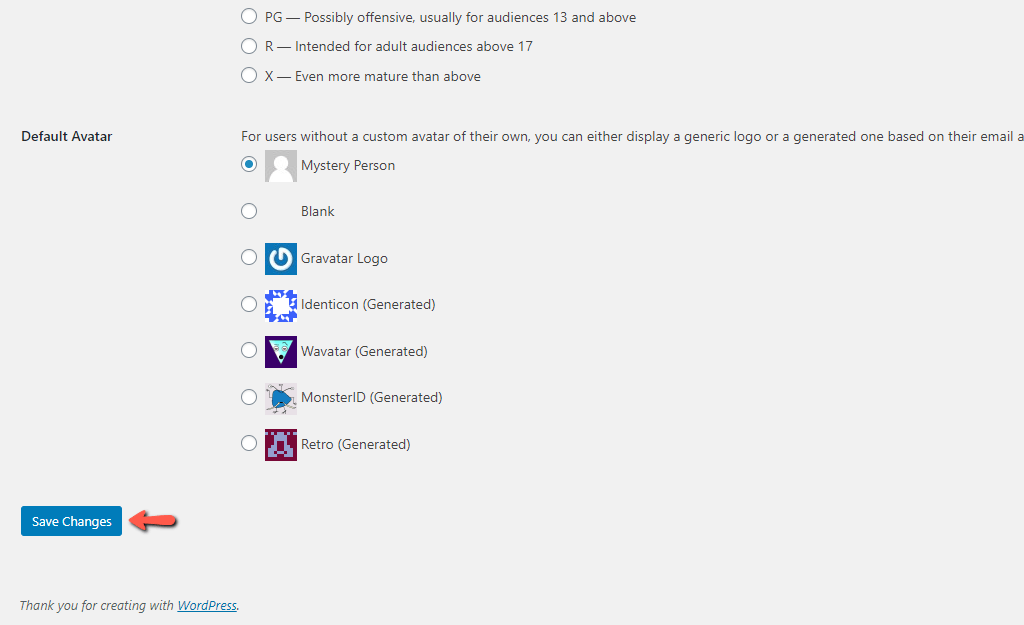
- Default Avatar – From this list, you can choose the default commenting avatar, which will be displayed for all users gravatar is not detected for.

When you perform all desired changes, please make sure to click on the “Save Changes” button to apply them successfully.

With this done, you have managed to successfully configure the Discussion settings and gained more control over the comments on your WordPress website. We hope the information in this tutorial helped you, and now you have a better understanding of how to manage your users’ comments.


