Introduction #
WinSCP (Windows Secure Copy) is a free and open-source FTP client that will allow you to transfer local files to your web hosting account and vice versa. You will also be able to remotely manage and edit your web files using it. In this tutorial, we will guide you on how to configure the WinSCP Client within a few simple steps.
Getting Started #
First thing first, you will need to download and install the WinSCP Client on your local computer. In case you do not have the client already installed, please go ahead and download it from WinSCP’s official website that you can directly access from here. All you will need to do is click on the “Download Now” button and follow the installation guide.
Afterward, you will need to gather the FTP details required to connect to your hosting account:
- FTP Username
- FTP Password
- Hostname (Server IP)
- Port
If you are HostArmada client you will be able to find the required details in the welcome email containing all the important information of your hosting account with us. You can review the email directly from your Client Area by clicking on the email icon located at the top menu bar. In case you have any difficulties finding the details, please make sure to submit a ticket request to our team and they will gladly provide you with them.
Configuring WinSCP #
In order to begin, please open the WinSCP client on your computer. Once you do that, you will be directly prompted with the “Login” dialog where you will need to enter the above-mentioned details.
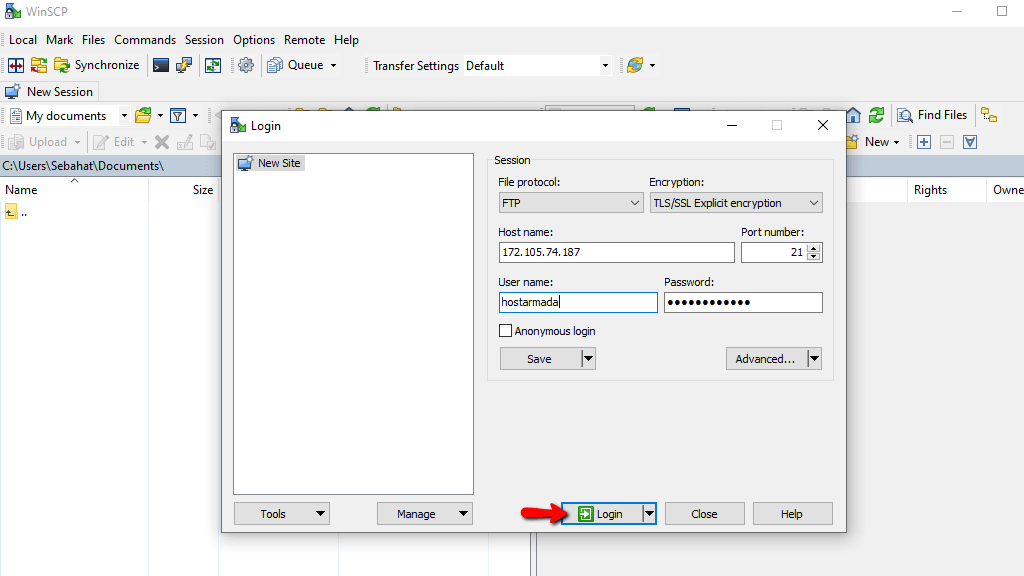
Please, specify the following:
- File protocol – From this dropdown menu, you will need to select the transfer protocol. In our case that will be the “FTP” protocol.
- Encryption – From this dropdown menu, you need to select the invocation method which will be used for the session. We do support the secure “TLS/SSL Explicit encryption” method, therefore feel free to select it. Please note that some providers recommend using the “No encryption” method, as the rest of them require additional configuration.
- Host name – In this field, you will need to enter the FTP Hostname or the server IP address. Usually, you are allowed to use your domain name, however, please note that this depends on the server configuration of your provider and the DNS settings of your domain. As previously pointed, if you are a HostArmada customer you can find the details in your welcome email.
- Port number – The port number is automatically filled when you select the “File protocol”. For “FTP”, please leave the default 21 port.
- User name – In this field, you will need to enter the FTP username. If you are using one of our hostings solution and you are configuring the main FTP account, please use your cPanel username.
- Password – In this field, you will need to enter your FTP password. Again, if you are using our hosting solutions, for the main FTP account, please enter the cPanel password.
Please, make sure to leave the “Anonymous login” checkbox unticked, as either way the verification of your login credentials will fail and you will not be able to connect.
From the dropdown menu available below you can choose whether you would like to save this FTP account or set it as the default one.
Under the “Advanced” dropdown menu, you will find settings that allow you to control server compatibility options, filename encoding, initial directories, etc.
Once you are ready with all the details, please click on the “Login” button in order to initiate the connection to your web hosting account.
In case you have selected the TLS/SSL encryption type, you will be promoted with a new TLS certificate inspection pop-up window where you will need to click on “Yes” to proceed.

After you confirm, you will be successfully connected to your web hosting account and you will see your web files listed in the right panel of the screen.

Well done! You have now successfully connected the WinSCP client to your web hosting account and you are ready to start transferring and managing your files. We hope you have found our tutorial useful and easy to follow. If you have experienced any difficulties or you have received any error messages, please do not hesitate to contact our Support Team for further assistance.


