Introduction #
By default, WordPress, like many other CMSs,is pre-configured to use the PHP mail function to send all automatically generated emails from your website. Due to the fact that the PHP Mail function sends the emails directly through the server IP address, there is quite a high chance for them to get marked as spam and consequently not delivered successfully.
Fortunately, the solution to that matter is rather simple and easy to achieve. It is called SMTP, and it basically connects your WordPress website with the Email service offered either by the Web Hosting Provider or by any third-party Mail Provider like Google Gmail, for example.
Even though the core WordPress settings do not allow you to configure and utilize the SMTP protocol for outbound emails, you can achieve that by installing a plugin. There are quite a few options you can choose from. In this tutorial, we will stick to the most popular and proven over time WP Mail SMTP by WPForms plugin.
In the following lines, we will walk you through the whole process, from installing the plugin to configuring your SMTP authentication details.
Getting Started #
Before we move forward, there is certain information you will need to gather. You need the following details:
- SMTP Hostname
- SMTP Username
- SMTP Password
You can obtain the details mentioned above from your email service provider. In case you are a Phluit customer, you will be able to find the required details in the welcome email containing all the important information of your hosting account with us. You can review the email directly from your Client Area by clicking on the email icon located at the top menu bar. In case you have any difficulties finding the details, please make sure to submit a ticket request to our team, and they will gladly provide you with them.
Next, we will need you to log into your WordPress Admin Dashboard. You can do that by accessing your domain followed by “/wp-admin“, i.e., “yourdomain.com/wp-admin“, where “yourdomain.com” stands for your actual domain name.
Once logged, please navigate through the left-hand side menu bar to Plugins > Add New.
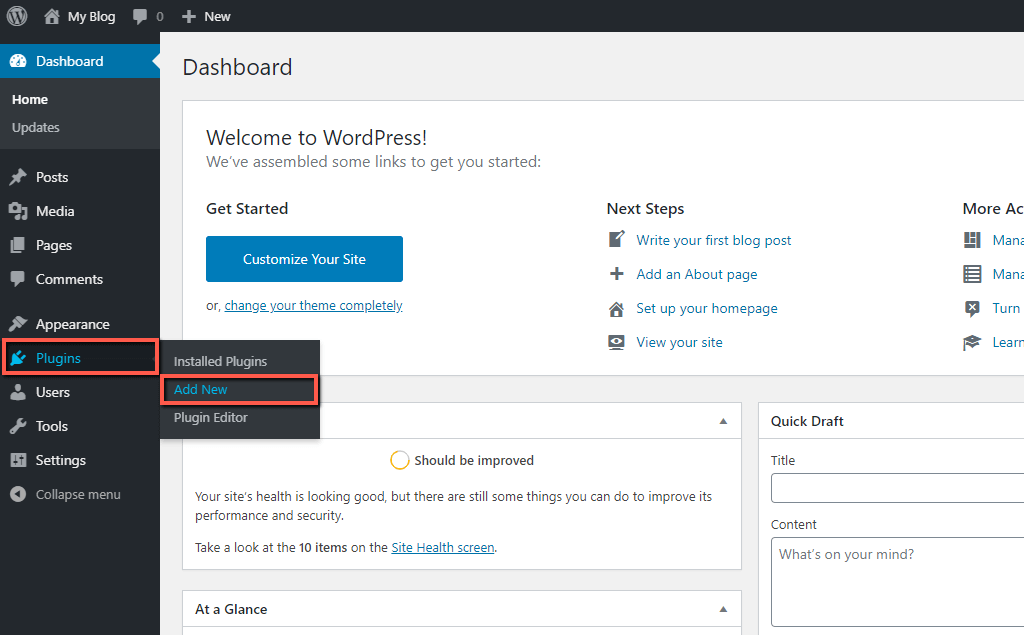
Upon doing that, you will be redirected to the standard WordPress Plugin Installation interface.
Installing the WP Mail SMTP by WPForms plugin #
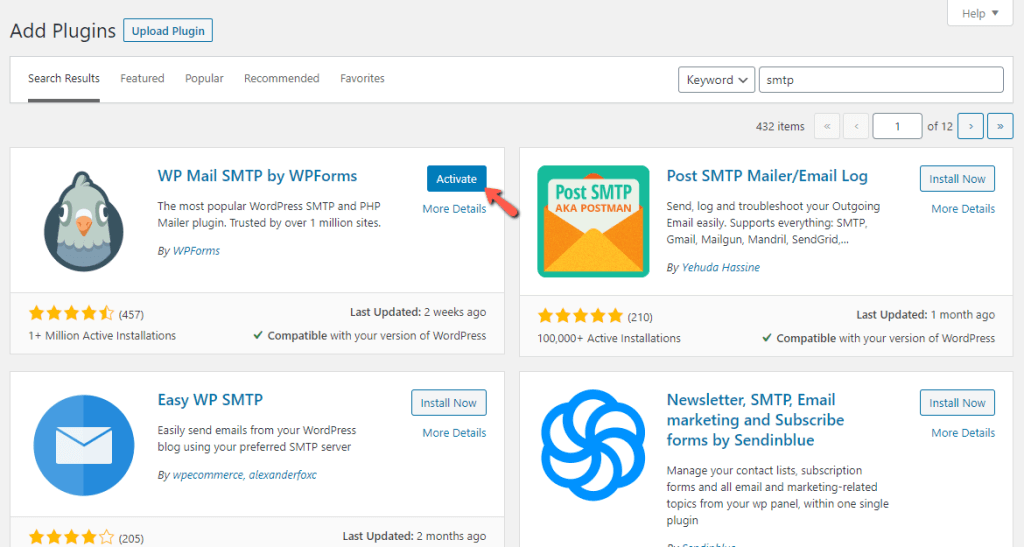
Now it is time to install the WP Mail SMTP by WPForms plugin. Please use the search tool positioned in the upper right corner. You may enter any keyword contained in the name of the plugin, such as “smtp“, for example.
Once the results are filtered, and you locate the plugin, please click on the corresponding “Install Now” button.

After a brief loading period, the plugin will be installed, and the “Install Now” button will be converted into “Activate“. Please click on it to get the plugin activated and ready for use.
With this done, you are all set and ready to step into the actual SMTP configuration.
Configuring SMTP Settings #
Now that the plugin is successfully installed and activated, you will see a new module within the left menu – “WP Mail SMTP“. Please hover over it and click on the “Settings” option.

Upon doing that, you will be redirected to the WP Mail SMTP settings section, which is divided into a few tabs. By default, you will be located within the “General” tab where you are supposed to be.
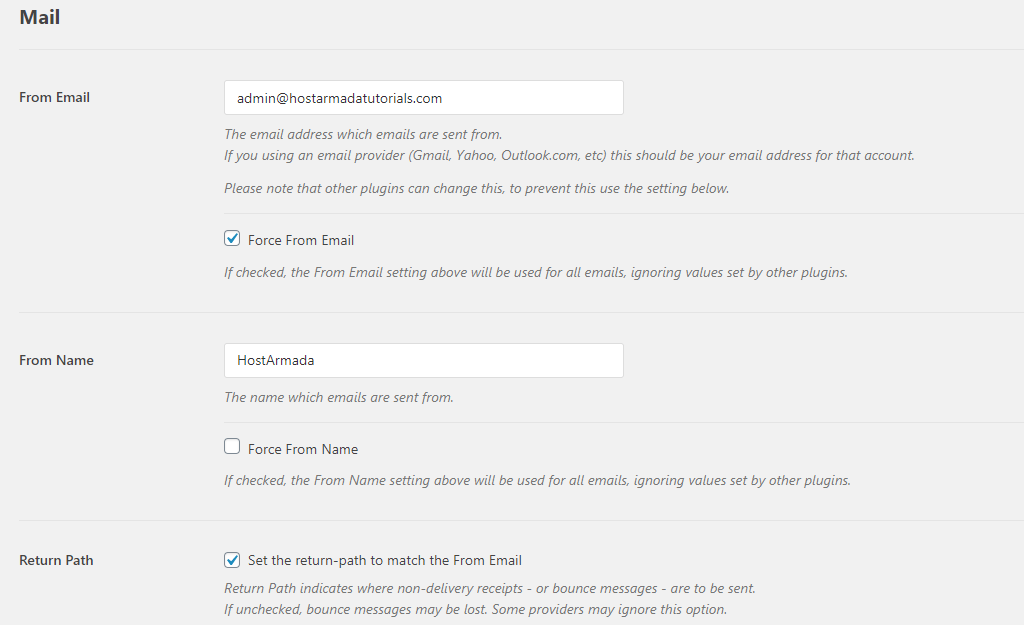
Please scroll a little bit down to the “Mail” section, where you will be able to configure the sender email address.
- From Email – In this field, you need to insert the email address you want WordPress to send outbound email messages.
- From Name – Here, you need to specify the display name, which will appear in the “From” field in your email messages.
- Return Path – We will recommend you to enable this option, as it will force the return path to be the same as for the sender email account. This will prevent a possible loss of bounced back and non-delivered email messages.
Afterward, please scroll to the next “Mailer” section and choose the “Other SMTP” option by clicking on the corresponding radio button.

Upon doing that, a new section will appear beneath where you have to insert your actual SMTP details we have mentioned at the beginning of this tutorial.
- SMTP Host – In this field, you need to enter the SMTP hostname of the email service provider. Typically, you can use “mail.domain.com” where “domain.com” represents your actual domain name. Note that for that setup to work, the DNS records of your domain name should be properly configured. Alternatively, you can always use directly the hostname of the SMTP server
- Encryption – In here, you need to choose the encryption method used to connect to the server and send emails. Depending on the port you intend to use, you need to select the corresponding encryption type. Port 25 – “None“, port 465 “SSL“, port 587 “TLS“. We would recommend you to choose TLS.
- SMTP Port – This field is intended for the connection port. Typically it will be preselected based on the encryption method chosen. Port 25 – “None“, port 465 “SSL“, port 587 “TLS“.
- Auto TLS – This toggle switch will only be available in case you have selected the “None” or “SSL” encryption method. When enabled, it forces a TLS connection. Note that you need to be sure it is supported by your email service provider.
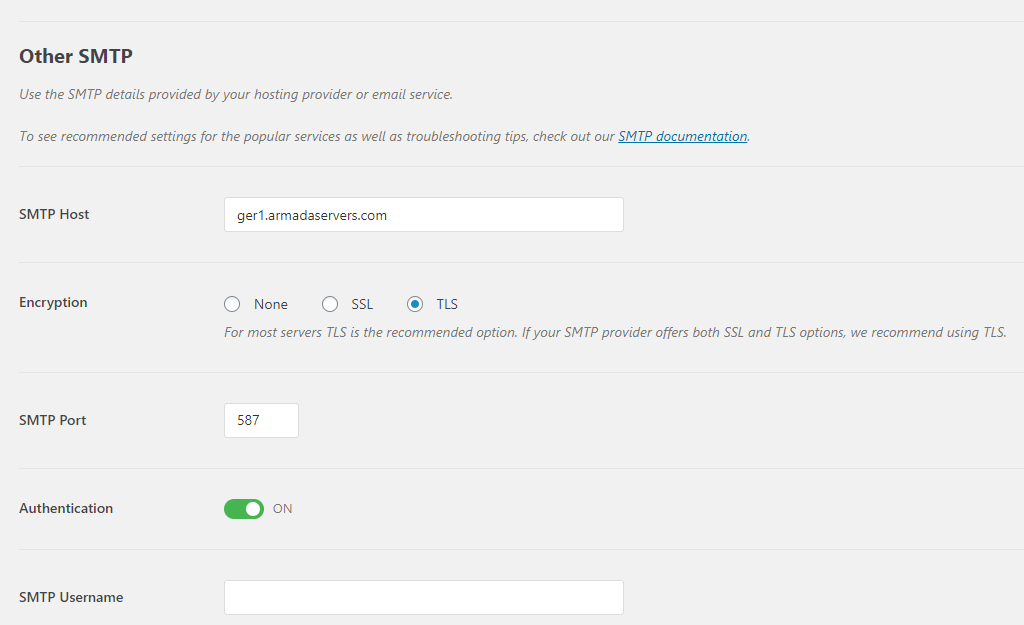
- Authentication – This toggle switch determines whether the email account needs to be authenticated on the server. Typically, this is required. Therefore, please make sure to leave it enabled.
- SMTP Username – The username is typically either the full email address or the email address prefix only.
- SMTP Password – In this field, you need to enter the password associated with the email account you are configuring.

When ready, please make sure to click on the “Save Settings” button to apply the changes.
Testing SMTP Configuration #
Now that you have configured your SMTP details, it is time to test out if everything is properly functioning and your emails are being sent successfully.
The WP Mail SMTP by WPForms plugin has a built-in test feature, which makes everything extremely simple.
To test the email delivery, please switch to the second “Email Test” tab within the WP Mail SMTP settings interface.
When there, just enter the desired recipient email address into the “Send To” field and click on the “Send Email” button.

When this is done, you will receive a success notification, and you can go ahead and check the mailbox of the corresponding email account.
In case, the SMTP configuration was done correctly, you will find the confirmation email message within your mailbox. It should look similar to the screenshot example below.

With this done, you are all set!
Congratulations! You have just learned how to configure your WordPress website to send emails over the SMTP protocol and ensure your outbound emails will be successfully delivered. We hope our instructions were clear enough and easy to follow. In case you have experienced any sort of difficulties, please provide our Technical Support team with your SMTP details over a ticket request, and they will handle the configuration for you.


