Introduction #
A Domain Name is simply a way to translate an IP address of a computer to a more human-understandable and easy-to-remember string. Every Domain name is associated with a website that is typically shown when the domain is accessed in your Web Browser. The process of associating a domain name with a website is usually the job of the Web Service of the Web Hosting Server, however, the actual tool that creates the Web Server domain configuration is the cPanel Control panel. In the next lines of this tutorial, we will review the cPanel feature “Domains” and we will show you how easy it is to manage all your domains using the provided tools.
Accessing the Domains feature of cPanel #
A mandatory requirement for a cPanel account to be initially created is that at least 1 domain name should be associated with the account. That domain name is called “Primary Domain Name” and it always opens the website stored in the “public_html” (“www“) folder of your Web Hosting Account. The “Primary Domain Name” of your Web Hosting Account cannot be changed or at least not by you. In order to change a “Primary Domain Name” you will have to submit a Technical Support Ticket so our Technical Crew can assist you with the change.
As we all know, cPanel supports multiple domain names. To provide that functionality cPanel defines different types of domain names depending on the way how they are added to your Web Hosting Account. They can be:
- Subdomains – A subdomain is an actual domain name that is part of another domain name. For example shop.domain.com, dashboard.domain.com, etc. Every subdomain can be configured to work with a separate folder stored within the “public_html” folder meaning that different subdomains can open different websites.
- Addon Domains – An addon domain is a completely separate, stand-alone domain name that is added in addition to the primary domain name. Each Addon domain can be configured to work with a separate folder stored somewhere on the Web Hosting Account. This means that each addon domain will open a different website.
- Aliases – An Alias domain is a separate domain name that is added in addition to the primary domain name. Alias Domains does not have the configuration to open different websites, meaning that they will always open the website for your “Primary Domain Name“.
Now that you are well familiar with the types of domain names, let’s see what tools and features cPanel has to offer when it comes to managing your domain names. Let’s begin by accessing the cPanel service.
To access the “Domains” feature once you are logged into the cPanel service, please either use the cPanel feature search at the top of the page or locate the “Domains” features group on the cPanel main page.

Once you find the “Domains” feature, please click on it. You will then be redirected to a brand new page called “Domains” where you will be able to continue with the domain management.
Create a New Domain Name in cPanel #
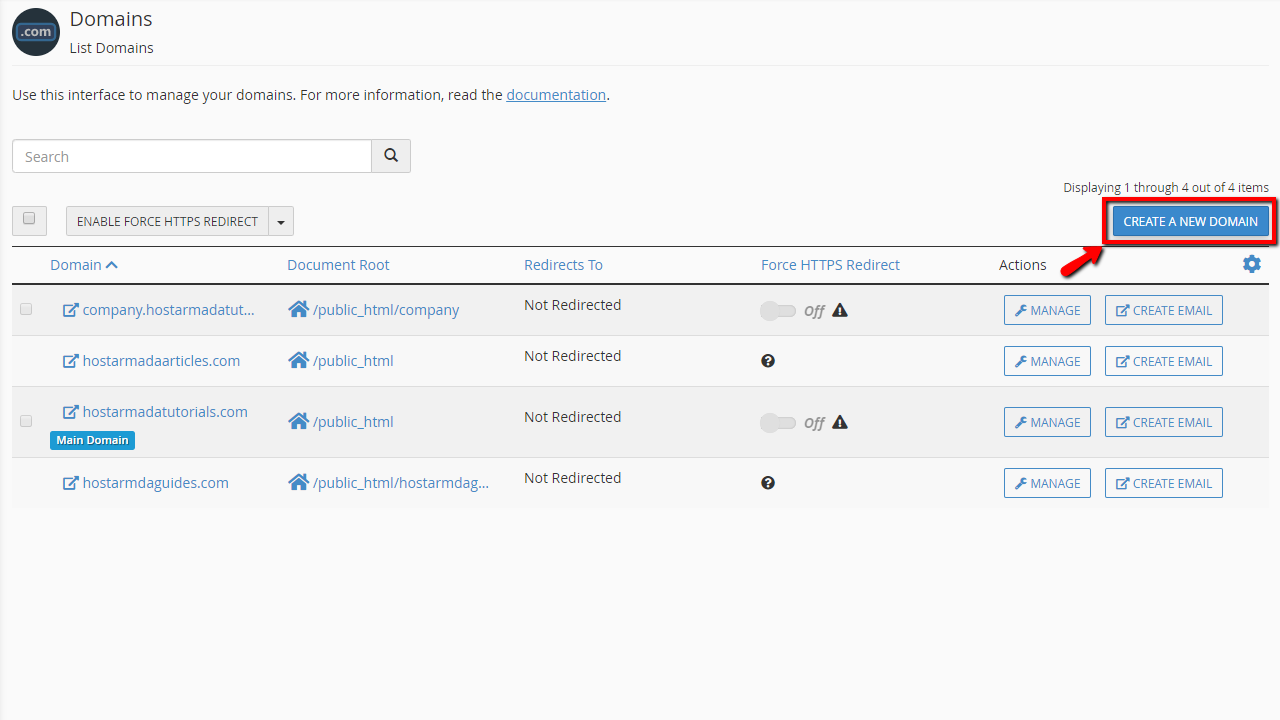
Now that you are on the correct page, let’s start by creating a new domain name. To create a new domain name, please click on the “CREATE A NEW DOMAIN NAME” button which should be located on the right side of the page.

The button will redirect you to a brand new page where there will be a single section called “Create a New Domain” which you will need to configure in order for the new domain name can be created. Before you can continue any further you will need to know what type of domain name you will be adding. As we have explained already, the three domain types you can add to cPanel are Addon Domain, Subdomain, or Alias. For each of these the configurations on this page are different.
Addon Domains #
To create a new Addon Domain please input the addon domain itself in the “Domain” field. Next, please remove the tick from the “Share document root” tickbox. These actions will reveal two new configuration fields. The first one will appear right beneath the “Share document root” tickbox and it is used for defining the path to the folder where the website for this addon domain will be managed. Or in other words, with this configuration, you tell cPanel that the addon domain will open a website from the configured folder. Please bear in mind that the folder you are about to configure there is relative to the “public_html” folder.
The second field that you have to configure is called “Subdomain“. It sounds confusing since you are adding a new Addon Domain. Why do you need to configure a new subdomain as well? The answer is simple, yet hard for understanding if you are not familiar with how cPanel works. This is simply the rule cPanel follows when creating addon domains – for each addon domain cPanel needs to create a single subdomain just so the addon domain is an actual alias of the subdomain. Of course, you do not need to remember that rule, nor to actually understand it. The only thing you will need to do here is simply set the subdomain. In fact, cPanel already filled it for you, so in case you would like to change it, please do so, however, we recommend leaving it as it is.
Finally, please click on the “Submit” button so your brand new Addon Domain can be added.

You will then be redirected to the main “Domains” page and your brand new domain name will be listed in the table with all the domain names associated with your Web Hosting account.
Subdomain #
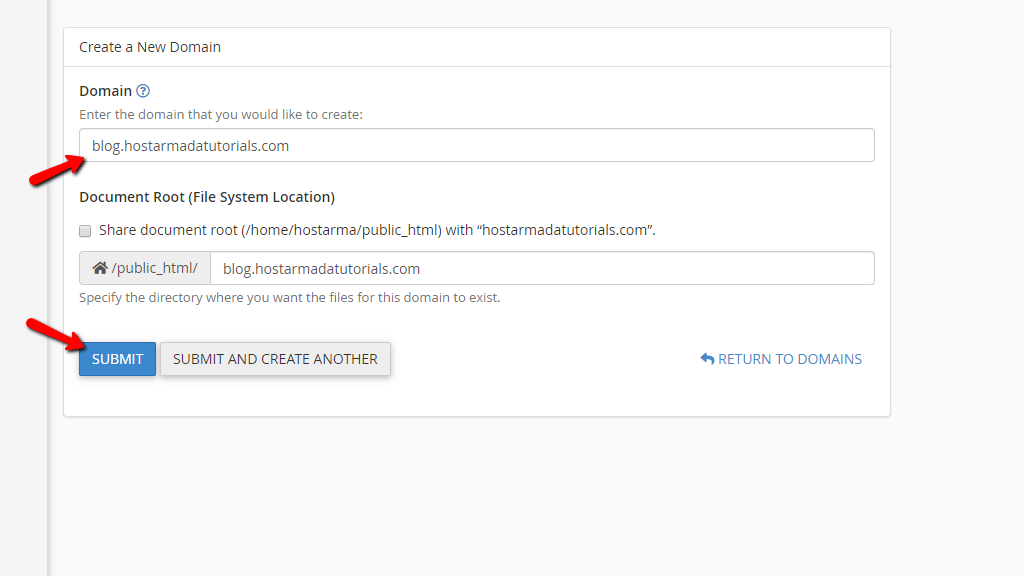
To add a brand new subdomain, please once again click on the “CREATE A NEW DOMAIN” button so you can be redirected to the same configuration screen called “Create a New Domain“. This time, please fill in your new subdomain into the “Domain” field. Please bear in mind that you will have to fill the whole subdomain including the actual subdomain part and the domain that it is associated with.
Another rule thing that you can take into consideration is that your subdomain is recommended to be associated with already create on your account domain name. Of course, you can add a subdomain that has nothing to do with your already created domains, however, you will need to ensure that the DNS configuration for that subdomain will be properly set into the DNS zone of the domain name this subdomain is associated with.
When you are done typing your subdomain cPanel will automatically detect it and will remove the check on the “Share document root” checkbox. If you would like to manage a separate website for your subdomain then you should leave this option unchecked, however, if you would like for some reason your subdomain to open the same website as your primary domain then please feel free to select that option.
Next, you will need to configure the document root for your brand new subdomain. cPanel already did that for you. By default, cPanel will create a new folder for each subdomain right within the “public_html” folder. The name of the new folder will be set as the subdomain you have entered so we strongly suggest leaving the name of the folder as it is. Of course, if you would like to set a new one, please feel free to do so.
Finally, please click on the “Submit” button so your brand new subdomain can be created.

Once your domain name is created, you will be redirected back to the main “Domains” page where you should be able to see the subdomain in the table containing all the domains associated with your Web Hosting Account.
Alias(Parked Domain) #
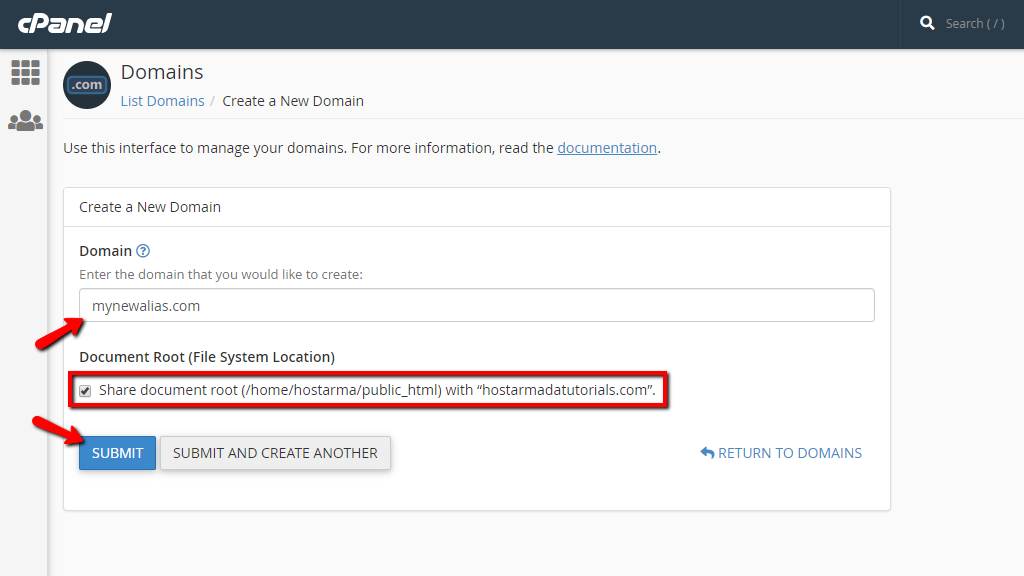
To add a new Alias in cPanel you will have to once again click on the “CREATE A NEW DOMAIN” button from the “Domains” main page. Now that you see the already familiar single section called “Create a New Domain” you will need to fill in the new Alias that you would like to create. As we have explained already an Alias Domain is used when you would like to add additional domains that should open the website of your primary domain or in other words, these domains are aliases to your primary domain. Therefore, the only thing you will need to do here is to simply put the new domain name into the “Domain” field and click on the “Submit” button so you can save the change.

You will be then redirected back to the “Domains” main page where your brand new Domain Alias will be listed in the table containing all the domains associated with your Web Hosting Account.
Manage Existing Domains in cPanel #
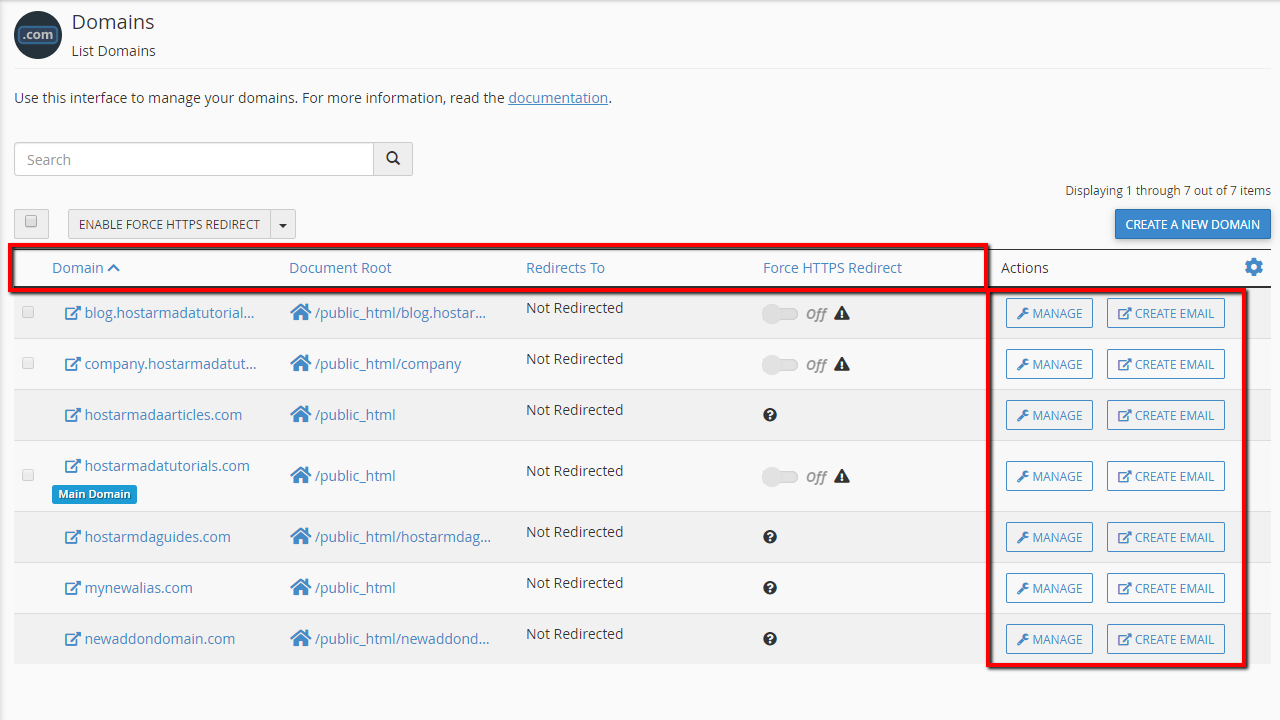
Now that you know how to create new domain names in cPanel, let’s see what actions you can take with your already existing domain names in order to fully manage those. When you access the “Domains” feature cPanel will load for you a complete table with all your domain names and with all the management actions you can take with these.
The table structure is quite simple, however, let’s review the included columns.
- Domain – In this column, you will see every domain name you have associated with your Web Hosting Account. The domain names are clickable and if you click on a domain name it will open in your browser displaying its website.
- Document Root – In this folder, you will be able to find the folder in which this domain is configured to work with. If you click on the folder it will open the “File Manager” cPanel feature so you can manage it fully.
- Redirects To – In this column cPanel will display any redirections configured for your domain via the “Redirects” cPanel feature.
- Force HTTPS Redirect – In this column you will be able to force a redirect to the https:// protocol for a domain name.
- Actions – In this column, you will see the available actions you can take with your domain name.

Now that you are familiar with the general management options, let’s see how to specifically manage a single domain name. To do that, please click on the “MANAGE” button for any of the domain names listed in the table. This action will redirect you to a brand new page dedicated to the selected domain name. The configuration options available on the new page may vary depending on the domain type you have selected. For example, if you choose to manage an Addon Domain or a Subdomain you will be able to configure the “Document Root” for that addon domain/subdomain, however, if you choose to manage an Alias you will be able to only delete it.
The available actions for you to take in order to manage your domain are:
UPDATE THE DOMAIN #
In this section, you will find a single field called “New Document Root“. Here you will be able to set a new folder for the domain name to work with. Please bear in mind that if you had a website into the old folder it will remain there, meaning that cPanel will not rename the folder but instead create a brand new one. Therefore, you might want to move your files after the change is saved.

To save the change, please click on the “UPDATE” button located at the bottom of the section.
REMOVE THE DOMAIN #
If you would like to remove the domain name from your web hosting account, please use the next section located right below the “UPDATE THE DOMAIN” section called “REMOVE THE DOMAIN“. In that section, there will be a single button, called “REMOVE DOMAIN” which after clicked will ask you to confirm the domain deletion.

Once the domain is removed, you will be redirected back to the main “Domains” page where you will be presented once again with the table of your existing domain names.
DOMAIN INFORMATION #
This is purely an informative section containing information about various configurations of your domain name. In this section you will find the fields:
- Domain – The actual domain name you are managing.
- Associated Subdomain – This field will be shown only after you click on the “Show Additional Details” link and it contains information for any related subdomains. Please bear in mind that if you are managing an Alias or a Subdomain this field will be removed since those types of domain names do not have an associated domain name.
- Redirects To – Here you will find information about any configured redirections for the domain name.
- Document Root – Here you will be presented with the document root of the domain/subdomain. The document root will be clickable so once you click on it cPanel will redirect you to the File Manager feature with the folder for this domain being selected so you can fully manage the files for the domain in question.

Additional Resources #
In this section you will find useful links, that will help you manage other related to this domain name features supported by cPanel. The links available here are as follows:
- CREATE AN EMAIL ADDRESS – This link will redirect you to the Email Accounts feature just so you can manage the email accounts related to the domain name you are managing.
- MODIFY THE ZONES – This link will redirect you to the DNS Zone editor feature which is used when you would like to manage the DNS zone of the domain you are currently managing.
- MODIFY THE REDIRECTS – This link will redirect you to the Redirects cPanel feature where you will be able to manage different redirects for the domain name you are currently managing.

That’s it! You are now fully aware of how to manage the Domain Names associated with your Web Hosting Account. Please bear in mind that depending on the used web hosting plan you may or may not be able to add additional Addon Domains. We strive to improve our Web Hosting packages with every possible feature, but sometimes it is necessary for some limitations to be put. In case you face any difficulties or errors during the process of managing your domain names, please do not hesitate to contact our Technical Support Crew so they can be able to fully assist you with the goal you are trying to achieve.


