Introduction #
In this guide, our focus will be on WooCommerce Product Categories. Organizing your products accurately will positively impact your users’ experience as they will be able to easily navigate through your Online Store and find exactly what they are looking for. We will show you how to efficiently classify your products and give your website that welcoming touch that encourages customers to buy. We will review the process of creating categories first, as this will allow you to easily order your products while you are adding them.
Getting Started #
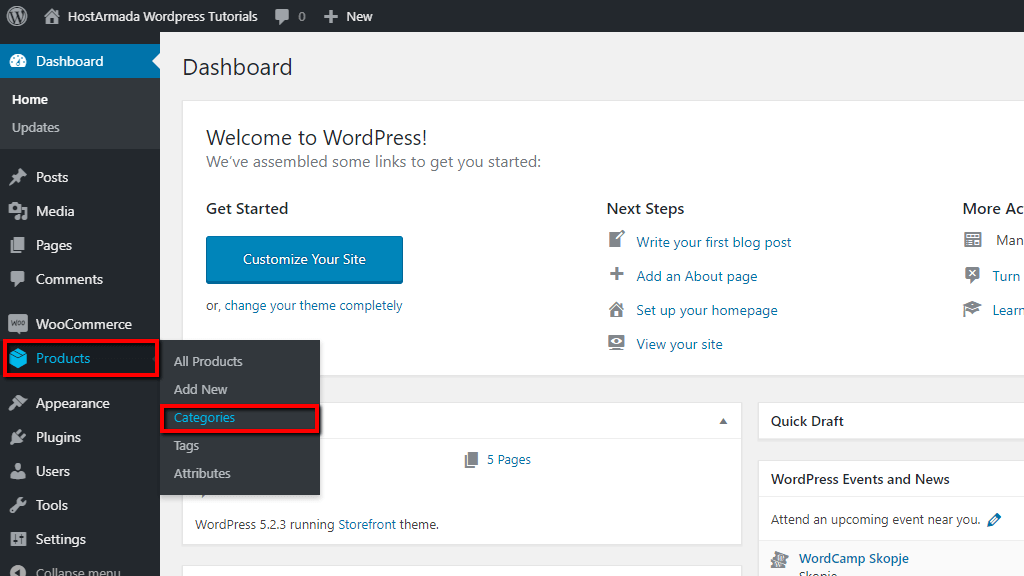
Now, in order to begin, please log in to your WordPress Admin Dashboard and navigate through the left menu bar to Products > Categories.
Then you will be presented with the “Product categories” page under which you will be able to add new categories, see the list of the current categories and manage them.

In the following lines, we will review how to add and customize categories and subcategories and how to manage your existing ones.
Adding a Product Category #
During the process of adding a new product, you will be able to create a category as well, the full set of settings presented here will not be available. Therefore, it is best to create your categories following these steps.
Now, if you are ready we will begin. As you have probably noticed there are only a few settings positioned at the left end of the page that need to be configured for your new category. Let’s take a peek.

In this example, we will be adding our “Accessories” category.
Let’s review the first three edit options one by one.
- Name – Under this field, you will have to enter the name of the category which will also appear on your store’s frontend.
- Slug – Here, you will need to enter the slug for this category. The slug usually contains only lowercase letters, numbers, and hyphens. If you leave the field blank WooCommerce will automatically default it to the “Name“.
- Parent category – This option will provide you with a dropdown menu containing all your current categories. If you are creating a subcategory that needs to be nested under a parent category, please select the given category, either way, leave it as “None“. For example, if you are creating a “Watches” category you may want to nest it under “Accessories” as a subcategory.

Following, there are three more edit options for your new category.
- Description – This field is optional. If you desire you may write a brief description of the category and its specifications. Depending on the theme you are using the description might be shown while your visitors are browsing your store by categories.
- Display type – From the dropdown menu here you will be able to select how your categories are displayed on your store’s frontend. The “Default” option uses the default display settings from your theme’s product display settings. The “Products” option will display only your products. The “Subcategory” option will display only your subcategories. And, the “Both” option will display your subcategories and all your products below them.
- Thumbnail – This option will allow you to upload an image for your category. Especially useful in case the theme you are using displays images for your categories.
Finally, please click on the “Add new category” button in order to save your new category.
Managing Product Categories #
At the right end of the “Product categories” page, you will see listed all your current categories. The order of the categories you see on your backend determines how they are displayed on your store’s frontend whenever the categories are listed. You will be able to easily organize them by clicking on the right handler and dragging the category to the desired position.

Under the list of categories, you will have displayed the “Name” of the category, the “Description” you have added for the category, the “Slug” and the “Count” which shows how many products you currently have under this category.
The “Uncategorized” is the default category created by WooCommerce. The default category is required and cannot be deleted. You will be able to rename it or set up another category, but there should always be one category serving as a default. All products you are adding that are not assigned to a specific category will be automatically assigned to the default category.
If you hover over a given category you will be presented with a few options.

If you click on the “Edit” button you will be able to change all the settings we initially configured for the category.
The “Quick Edit” button will allow you to change only the name and the slug of the category.
The “Delete” button will allow you to remove the category in case it is no longer needed. Please note that deleting a category will not remove the products you have under this category, instead, they will be assigned to the default category (i.e. “Uncategorized“).
If you click on the “View” button it will allow you to review how the category is displayed on your store’s frontend.
And the last “Make default” button will allow you to set up this category as a default category.
Congratulations! At this point, you have learned how to add your product categories, how to organize and manage them. Now that you have successfully added your categories you will be able to easily assign your products to the proper category while you are adding them. In the following guides, we will cover the WooCommerce Tags and Attributes in order to fully prepare you for the process of adding your first product.


