Introduction #
Widgets are extra features and functionalities that could be implemented in WordPress based websites. They can be added to widget-ready areas, which typically are the sidebar, the header, or the footer of a web page.
Widgets are intended for including search boxes, text boxes, galleries, video players, and other useful features.
In this tutorial, we are going to review the process of adding a new widget on your website. You will be surprised by the fact it is as simple as dragging and dropping it to the desired area.
Accessing the Widgets section #
For a start, please log into your WordPress Admin Dashboard. You can do that by accessing your domain followed by “/wp-admin“, i.e., “yourdomain.com/wp-admin“, where “yourdomain.com” stands for your actual domain name.
Once logged, please navigate through the left-hand side menu bar to Appearance > Widgets.
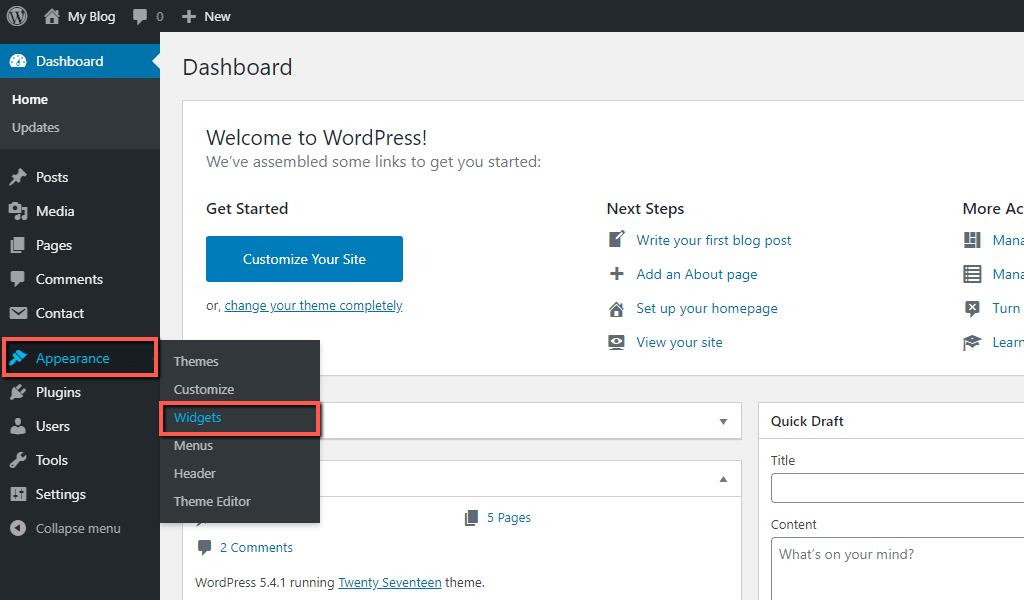
Upon doing that, you will be redirected to the “Widgets” management section, where you will be able to add new widgets or remove and reorganize the existing ones.
Widgets Section Overview #
As you can see, the “Widgets” page is divided into two sections.
The left section presents the available widgets you can add to the widget-areas of your website. A default WordPress installation comes with a number of built-in widgets. In addition to that, some themes and plugins also come pre-packet with a set of widgets.
The right section consists of a few blocks which represent the actual widget-ready areas supported in the theme you are currently using. Most WordPress themes are widget-ready and support multiple widget areas. Still, themes are NOT required to have widget areas. If you do not see any widget areas, this means that your theme does not support them.
Typically, in that section, you will see drop-down lists labeled “Blog Sidebar”, “Footer 1”, and “Footer 2”. The default set of Widget-ready areas begins with the “Blog Sidebar” area. This is the actual sidebar displayed on every page. As the name suggests, the footer areas represent the actual footer in your web pages. “Footer 1” one represents the left side of it, while “Footer 2” the right side.

Now, you are familiar with the interface of the “Widgets” section, and we expect you to be ready to step into actually adding them to your website.
Adding New Widgets #
There are various ways to add widgets to sidebars available in your WordPress theme. We will review all of them, so you can choose which one seems more convenient for you.
By Dragging-and-Dropping #
The easiest way is to find the desired widget within the “Available Widgets” list and simply drag and drop it to the panel representing the area in which you want to add it.
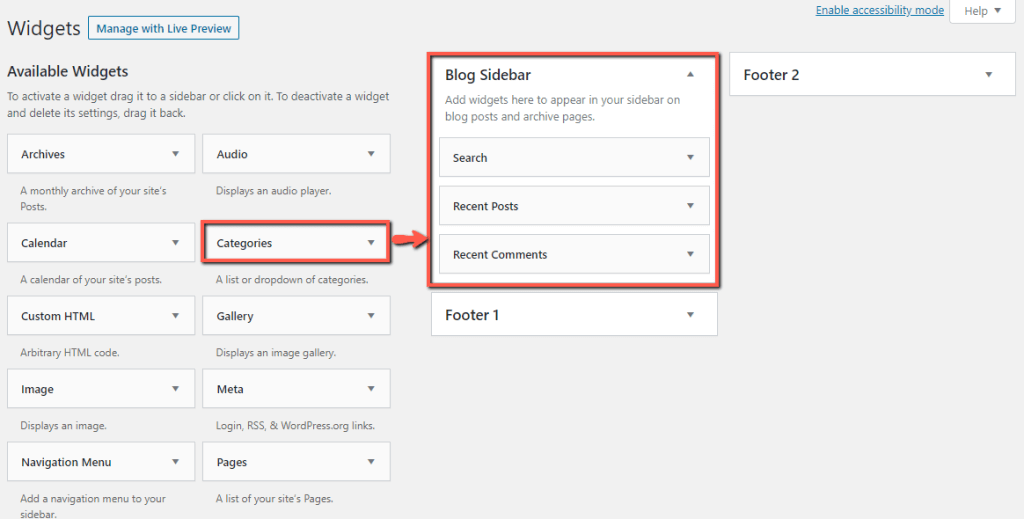
Simple as that the desired widget is added in the widget area, and it is ready to be customized. Please note that depending on the widget, the settings you will be provided with may vary. However, in any case, you will need to specify the “Title,” which will represent the widget within the corresponding area of your website page.
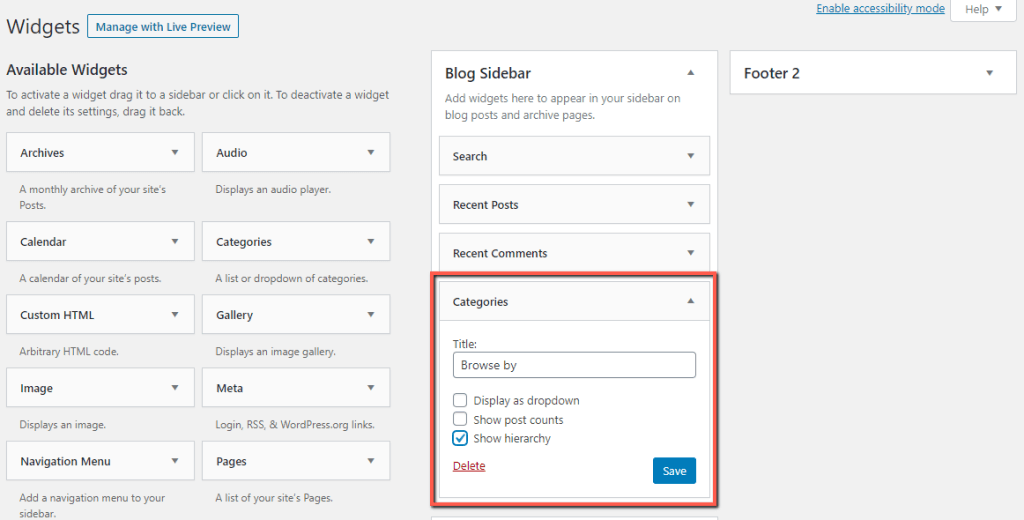
Once you define the title and alter the rest of the settings as required, please make sure to click on the “Save” button to apply them. The “Delete” link within the meta box is intended for removing the widget from the corresponding widget-area.
You are also able to control the order in which they appear on the frontend by simply dragging and dropping them to the desired position within the scope of the panel they are added to.
When the widget is added and saved, it will be immediately displayed on your website frontend. You can double-check how it appears by accessing your site’s Home Page.

With this done, you are completely ready. We hope you have managed to easily include the desired feature in the correct area of your website.
By manually selecting the Widget-Ready area #
The second way to add a widget to the widget-ready areas is to click on the widget from the list of “Available Widgets” and select the desired widget area from the dropdown menu.
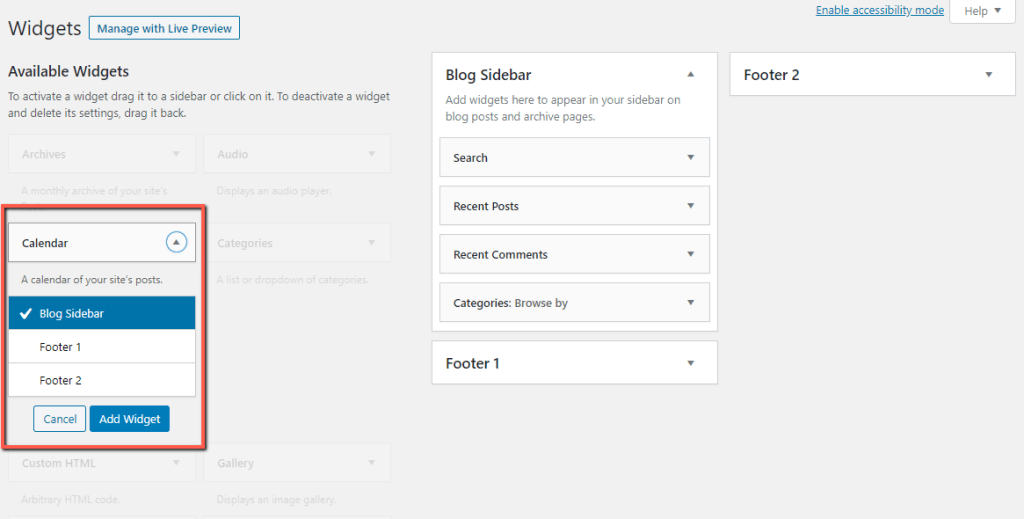
Once selected, please click on the “Add Widget” button to add it.
The moment you click on the “Add Widget” button, the widget will instantly appear on the intended widget-area, and you will need to configure the title and the rest of its settings, as shown in the previous section of this tutorial.
Within the Theme Customizer #
There is another approach rather than from the “Widgets” section, allowing you to add widgets to your WordPress website. You can do that using the Theme Customizer by navigating to Appearance > Customize from the main navigation menu in your WordPress Admin Dashboard.
Within the Theme Customizer, navigate through the left menu to Widget > Widget-Ready Area > Add a Widget.
It is important to know that this method may not be available in case your theme does not support the Theme Customizer. Also, you should note that some widget-ready areas may not be displayed. Therefore, we recommend sticking to the “Widgets” section when adding widgets in WordPress.
To sum up, in this tutorial, you were introduced to the Widget concept in WordPress and you have learned how to add widgets to a specific area on your website. We hope you have managed to easily follow our instructions, and you were able to include the features you were after.


