Introduction #
As a WordPress user, you are probably aware of how important updates are. It is highly recommended, not to say that it is mandatory, to always keep your WordPress website updated to the latest available version. Newer versions are constantly introduced and the goal is to evolve. They do come with security, functionality, and performance updates. In this tutorial, we will step-by-step guide you on how to safely update your WordPress version and we will introduce a few methods to achieve that. You are welcome to follow the most convenient way for you.
Getting Started #
Before we being, we need to make a couple of important notes.
The first thing you need to know is that the process of updating the version will affect all WordPress core files, therefore any modifications you have made will be overridden.
The second, most important thing, is to create a full backup of your website before you step into updating the version. This way you will be safeguarded and prepared for any possible situation and you will be able to restore the website to the current state.
Third – it is recommended to deactivate all your plugins. In some cases, they might not be compatible with the new version and cause certain errors and dysfunctionalities on your website.
You may also consider enabling the maintenance mode while you are performing the update.
Now that we got it all clear, you are ready to move forward to updating your WordPress version.
Method one: Updating WordPress via the One-click update button #
The thoughtful people who created WordPress have put a great effort to ease its users as much as possible. Without a doubt, this is the easiest way to update your version – you will be able to do it with only a few clicks.
In order to do that, please log in to your WordPress Admin Dashboard.
Whenever an update is available you are prompt with a message displayed at the top of the home page welcoming you to proceed with the version update.
All you will need to do is to click on “Please update now”. If for some reason the banner is not displayed, you can click on the “Updates” option at the left-hand side menu bar.

Then you will be re-directed to the “WordPress Updates” page and you will simply need to click on the “Update Now” button to initiate the process. From this page, you can also review the available theme and plugin updates.
Please note that while the update is ongoing your website will be put in a maintenance mode.

You will need to allow the process with a few moments to successfully finish. Upon completion, you will be introduced to the specifications of the new release. We will recommend you to also update the themes and plugins you are using in order to ensure they are compatible with the new version.

Believe it or not, it was that simple – you have successfully updated your WordPress version.
Method two: Manually Updating WordPress via FTP #
This method can be used as a backup plan, in case you are unable or unwilling to use the automatic update for some reason. You can manually update WordPress by using your favorite FTP Client or the “File Manager” integrated into your “cPanel” account.
First thing first, you will need to download the latest version from the official WordPress website which you can directly access from here. Simply, click on the “Download WordPress X.X” button and the archive file will be downloaded to your local computer within a few moments.
Once the download process is completed, please go ahead and extract the archive file locally. You will end up with a folder called “wordpress” which contains the required files. Please access the folder and delete the “wp-config-sample.php” file and the “wp-content” folder in order to avoid important data loss during the update process.
When you are ready, you will need to connect your FTP Client to your web hosting account. If you are not sure how to do that, you can find detailed instructions in our FTP-based tutorials available here. You will also find information about how to upload and delete files which you will need to do in the next steps.
As soon as you establish a successful connection, please go ahead and delete the existing “wp-admin” and “wp-includes” directories from your web hosting account. Usually, your web files are listed in the right panel, but that may vary depending on the FTP client you are using.
Afterward, navigate through your local folders (usually the left panel) to the “wordpress” folder where you have extracted the archive files, select all available files and upload them to the WordPress installation directory in your web hosting account. Please note that since these files already exist in your web hosting account, a pop-up window will be displayed and you will need to confirm that you agree to override all the files. Once the upload process is initiated, please allow it some time to be successfully completed.
When it is done, you will need to access your WordPress Admin Dashboard, where you will be prompt with a new message requiring you to confirm the database update. Please, make sure to click on the “Update WordPress Database” button to initiate the process.
as the version update might require a database update as well. When you access the admin page, you will be presented with the “Database Update Required” screen and you will need to click on the “Update WordPress Database” button to finalize the process.

When the update is performed you will be prompted with an “Update Complete” message stating that it all went successfully.
Now, if you click on “Continue” you will be re-directed to the WordPress welcome page where you will be introduced with the specifications of the new release. We will recommend you to also update the themes and plugins you are using in order to ensure they are compatible with the new version.

With this done you are all set! This method is quite more complicated compared to the one-click update button available at the dashboard. Therefore, reading carefully and following the instructions step by step is important in order to avoid any possible issues with your website.
Congratulations! Now you are familiar with the process of updating your WordPress website and you can keep everything up-to-date. We hope you have found the information in this tutorial useful and our instructions easy to follow. In case you require any further assistance, please make sure to escalate the request to our Technical Support Team by submitting and ticket request and they will gladly perform the update for you.
Method three: Manually Updating WordPress from the Command Line with WP-CLI #
The third method to update WordPress is from the Command-Line. This method requires SSH access to your web hosting account and WP-CLI enabled on a server level by your hosting provider.
Although updating WordPress over SSH is relatively simple you are expected to have good understanding and experience working over the Command-Line.
At this point, we presume you have established a successful SSH connection to your hosting account.
Once connected, please use the cd command to navigate to the root folder of your WordPress installation. For example:
cd public_html
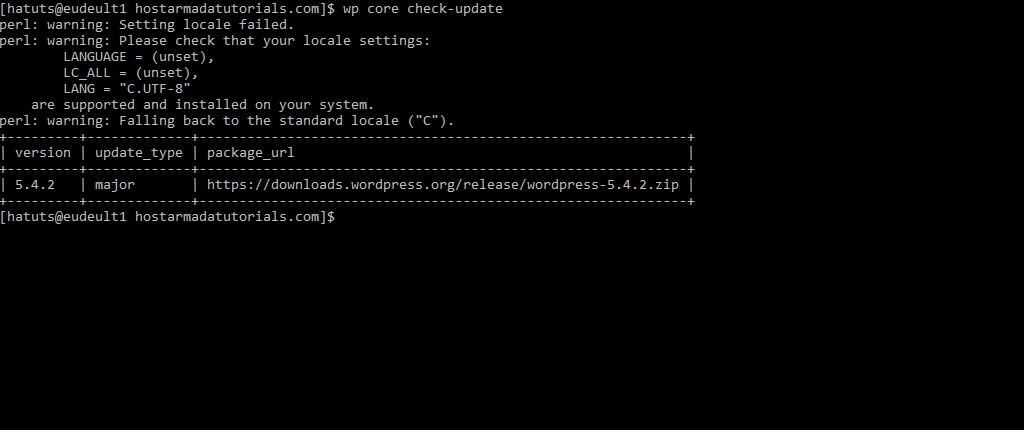
Once you are located in the intended directory, please run the following command, which will initiate a check for available WordPress updates.
wp core check-updateIf a new version is available you will receive a similar output:

In case you are utilizing the latest stable version, you will be presented with a “Success: WordPress is at the latest version” message instead.
To initiate the update of WordPress, please run the following command:
wp core updateOnce the command is executed, please allow it the necessary time to be completed. When finished, you will be presented with a “Success: WordPress updated successfully.” message and your WordPress website will be updated to the latest stable version.
If necessary, you may also update your database, by executing the following command:
wp core update-dbCongratulations! In this tutorial, you have learned three methods for updating your WordPress website. Now you have the convenience to choose the most convenient way and have an alternative in case the automatic tool fails.


