Introduction #
Google Analytics is a free web traffic analytics service supported by Google that allows you to monitor your site data and user activity. It gathers a wide range of information and provides detailed audits on website performance. It presents ready reports, which, when properly analyzed, can be used as a base for improving marketing and advertising strategies, user segmentation, website design, content, and functionalities.
Google Analytics is integrable with a JavaScript code snippet inserted into the header of all website pages. Generally, there are two main approaches for integrating Google Analytics into WordPress – manually and with a plugin.
In this tutorial, we will step-by-step guide you on the process of manually adding the required code to your WordPress-based website. Although this might sound complicated, the way WordPress is set up converts it into a relatively simple task.
Getting Started #
First thing first, you need to set up your Google Analytics account. This is a free service, and all you need is a Google account.
In order to add Google Analytics to WordPress, you will need the “Global Site Tag (gtag.js)” presented during the setup of your account.
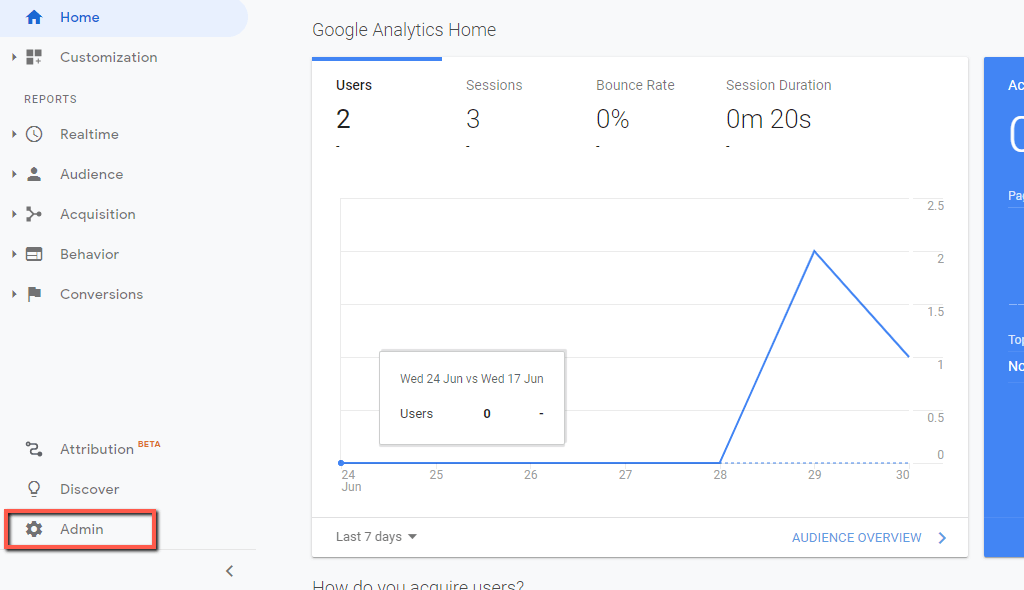
In case you have not saved it, please log in to your Google Analytics account and click on the “Admin” option at the bottom of the left menu.
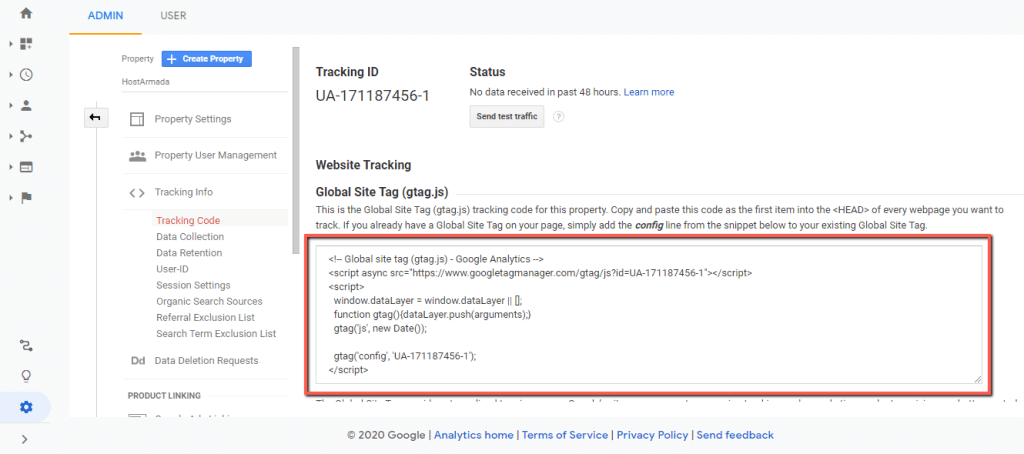
Afterward, please click on “Tracking Info” positioned in the middle “Property” column. Upon doing that, you will be presented with a dropdown with additional options – please select “Tracking Code“.
Once this is done, you will see the required code displayed in the “Global Site Tag (gtag.js)” content box.
Please make sure to either keep the page open or copy the code. Also, note that this is sensitive data, therefore you need to keep it secure and not share it with anyone.
Next, before you step into making any changes to the code of your WordPress website, it is always recommended to create a backup copy first. You will be editing the code which outputs your site, and any mistake as insignificant as it may seem can interrupt its proper functionality.
If you are a Phluit customer, we already got you covered in this aspect, as our shared solutions come bundled with a free backup feature. Furthermore, they are stored on remote servers for enhanced security.
Inserting the Tracking Code in the header.php file #
Now you are completely ready to step into actually adding the Google Analytics Tracking code you have copied earlier into your header.php file.
Whichever way to decide to follow, note that the code has to be inserted right after the opening <body> tag of the header.php file (wordpress_root/wp-content/themes/theme_name/header.php). Also, you need to make sure to save the file after you apply the change.
For the sake of our example, we will perform the change through the WordPress Backend as this is the most beginner-friendly approach. If you are going along with us, please log into your WordPress Admin Dashboard.
You can do that by accessing your domain followed by “/wp-admin“, i.e., “yourdomain.com/wp-admin“, where “yourdomain.com” stands for your actual domain name.
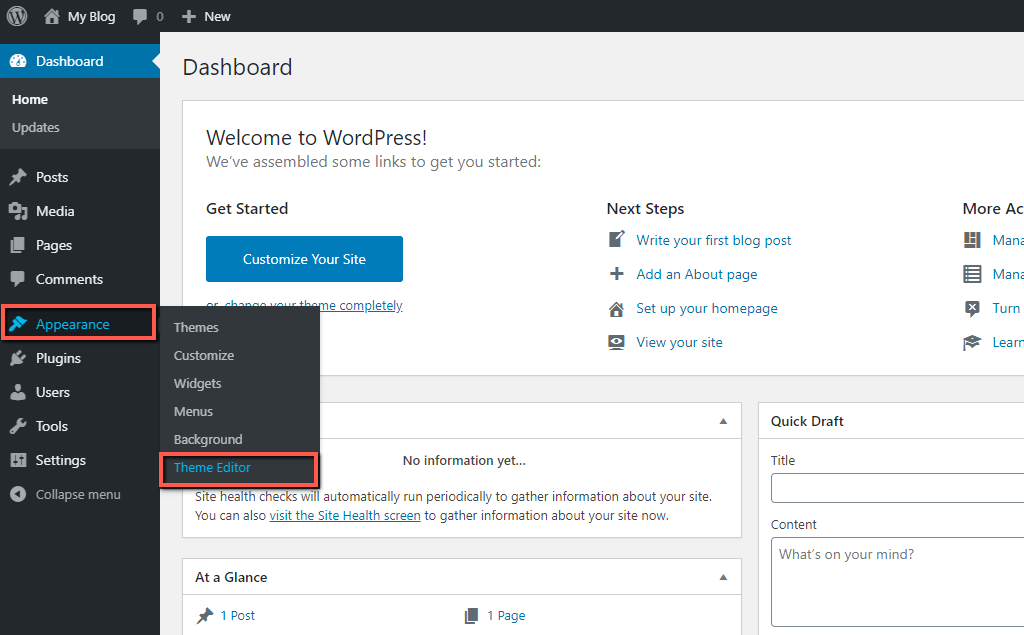
Once logged, please navigate through the left-hand side menu bar to Appearance > Theme Editor.
Upon doing that, you will be redirected to a new page divided into two sections. The left one displays the content of the selected file, while the right “Theme Files” panel lists all theme files.
Please navigate through the list of files and select the “Theme Header (header.php)” file.
When the content is loaded in the left section, please insert the Google Analytics Tracking code as shown in the screenshot example below (right after the <body> tag).
When ready, make sure to click on the “Update File” button to save the changes. Upon doing so, you will receive a notification indicating the file was saved successfully.
With this done, you have integrated Google Analytics into your WordPress-based website. Now you are ready to start monitoring and analyzing your web traffic by going to your Google Analytics Dashboard.

Congratulations! In this tutorial, you have learned how to manually integrate Google Analytics to your WordPress-based website without the need of a plugin. Now you can easily analyze your traffic and use the reports to improve your website. We hope this information was useful to you, and our guide helped you to complete this task with ease.


