Introduction #
Having a backup of your website’s database is equally important as having a backup of its files. The backup availability ensures that no matter what sort of damage or change you made to the database, you can rely on an earlier copy that you can restore and undo what has been done. This gives you peace of mind that no matter what happens to your database, you will be able to reverse it to a previous state. If your website is hosted on Phluit, then you are in good hands, as we provide our clients with available database backups that you can restore whenever needed. In this tutorial, we are going to talk about the “Database Backup” feature under “JetBackup” in cPanel- a tool that you can use to bring back a previous version of your website’s database from at least 7 days, back based on your shared hosting plan. Let’s get started!
Getting Started #
To use the database restore tool, you need to log into your cPanel account first. If you are not sure how to do that, please refer to our How to access the cPanel service tutorial. As soon as you log in, you will notice a couple of sections, each having a different icon that represents the various cPanel features. The icon you should be looking for is the “Database Backups”, which will be located under the “JetBackup” features group.

Once you press it, you will be taken to a new page containing a table section, which will be populated with all the available database backups.
Restoring Website Database #
Let’s go over the table section mentioned above and explain what its columns contain.
- Database Name – This column indicates the name of the database.
- Creation Date – This column displays the date on which the backup is created. It will typically contain at least 14 copies for the past 14 days. Note that, the number of available backups varies, based on your shared hosting plan.
- Size – This column indicates the size of the backed-up database.
- Notes – This column contains notes added to the backup if any. To add a note, all you need to do is click on the “Click to add Note…” label on the corresponding row.
- Location – This column shows the location of the backup. It can be either remote or local.
- Actions – This column contains the available actions you can do with the backup. You should see only the “restore” button there.

To restore the desired database backup, all you need to do is press the “Restore” button, located in the corresponding row. Clicking the “Restore” button will expand the row, and 2 additional options will be revealed – the “Add to Restore Queue” button and the “Cancel” link.
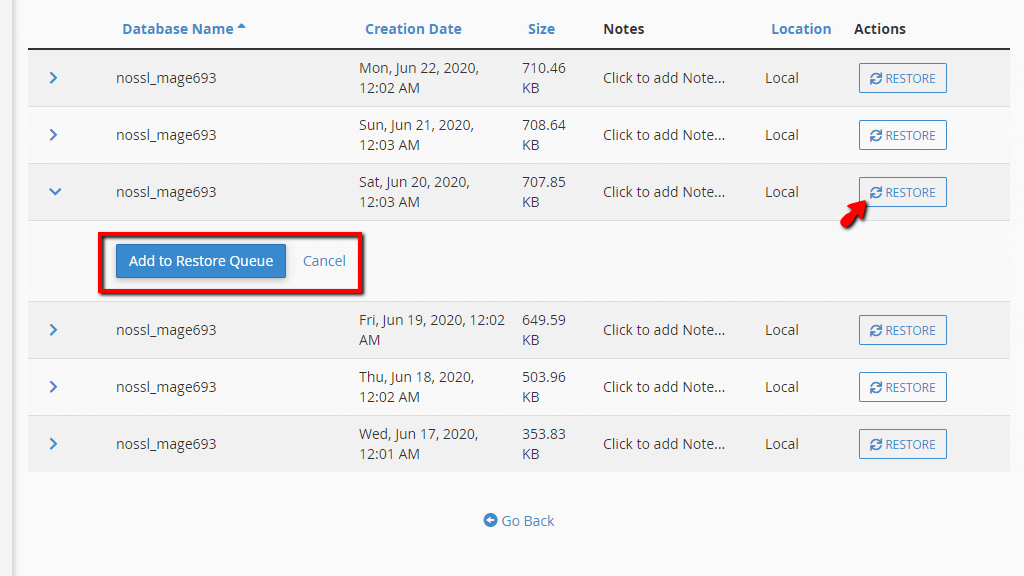
If you wish to start the restoration process, please press the “Add to Restore Queue” button. Alternatively, press the “Cancel” link.
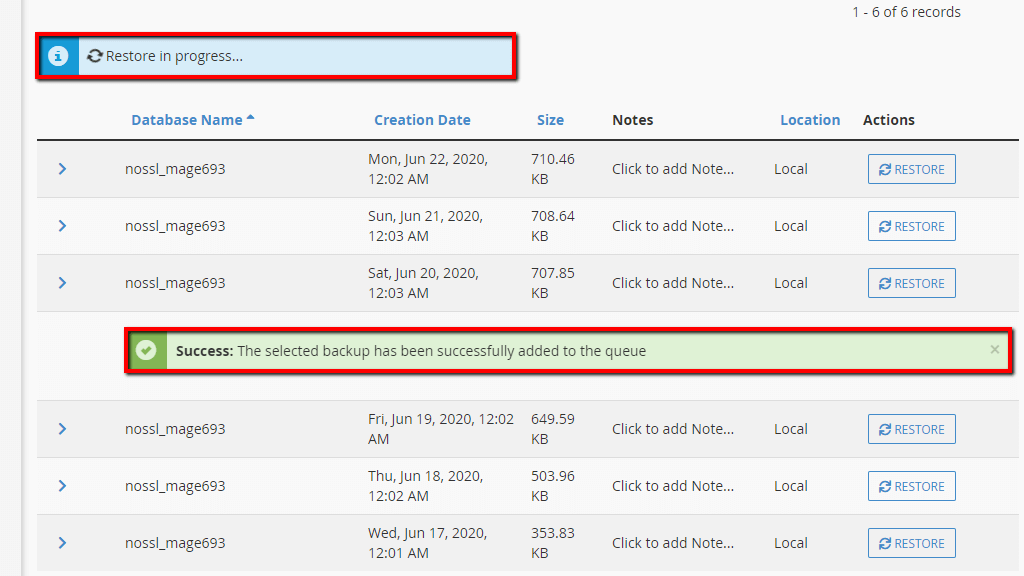
Upon clicking the “Add to Restore Queue” button, you will see a success message, and on the top of the table, you will see a blue bar with a spinning cogwheel, which shows that the restoration is in progress. You may wait on this page until the blue bar is gone, which will signify that the restoration process is complete. Alternatively, you can access the JetBackup “Queue” feature.

To access it, you need to go back to the cPanel index page. Afterward, find the “JetBackup” section and press the “Queue” icon.
Upon clicking on the “Queue” icon, you will be redirected to a page that has yet another table section populated with your most recent backup restores.

Let’s go over all the columns under this table section.
- Type – This column shows the type of restore. It could be Files, Databases, or Emails.
- Date – This column displays the date on which the restoration process was started.
- Target – This column indicates the name of the account where the restore is being processed.
- Status – This is the column that you should be most eager to see! It will display either a “Completed”, “Failed” status, or “In Progress” status.
- Action – This column will be empty in case the process had been successfully completed or still in progress.
Once you notice the “Completed” message under the “Status” column, this means that the file restoration is complete, and you can now go and test out your website.
Here you go! The method of restoring your website’s database using the “Database Backups” feature in cPanel. We hope our instructions were clear enough and helped you to perform the restoration process with ease. If this is something you are not confident doing on your own, you can always request assistance from our Technical Support team by submitting a ticket from your Phluit Client Area. In the ticket, please include the website database name, along with the date from which you would like to restore it.


