Introduction #
As you already know WordPress tags are intended for better arranging and grouping your blog posts.
When organizing your website content using tags, you will definitely come to a point where you would like to perform certain changes. From time to time, you may need to modify some tag details to keep everything up-to-date. You may also need to completely remove some old tags that are no longer required.
In this tutorial, you will find detailed instructions on how to perform these simple tasks in your WordPress based blog and keep your tags list well organized.
Accessing the Tags Section #
To begin, please log into your WordPress Admin Dashboard. You can do that by accessing your domain followed by “/wp-admin“, i.e., “yourdomain.com/wp-admin“, where “yourdomain.com” stands for your actual domain name.
Once logged, please navigate through the left-hand side menu bar to Posts > Tags.

Upon doing that, you will be redirected to the “Tags” section, where you will find a list of all your existing tags.

You should be aware of the fact that any changes you apply to your tags will affect all posts the tag is currently assigned to. This is an extremely useful method to regroup your posts, but you should also be cautious with it as it may cause a huge mess.
Editing Tags #
Like any other WordPress element, the tags can be edited in two ways.
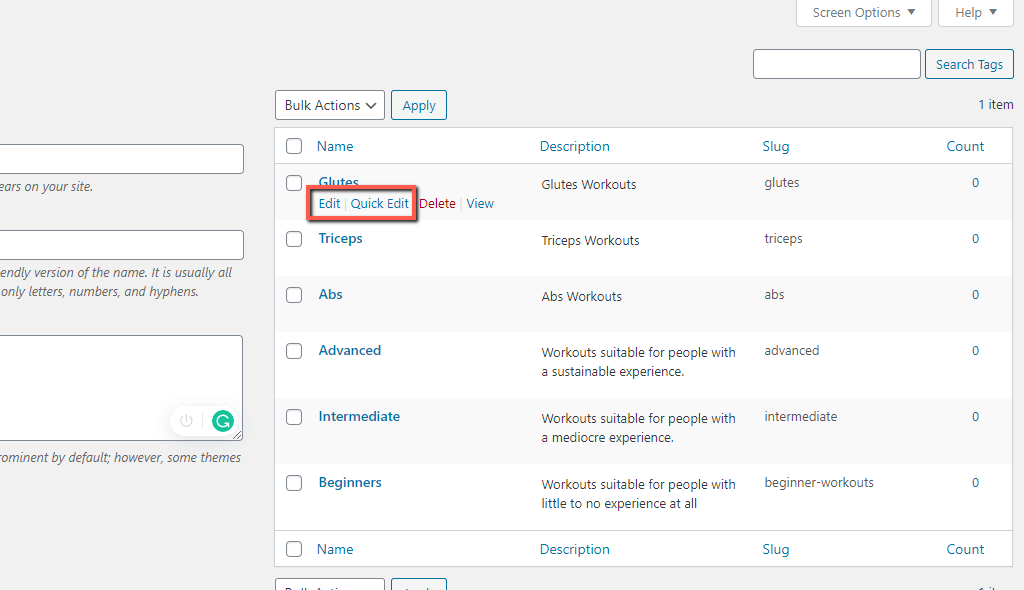
First, please navigate through the list and locate the tag you would like to update. Once you find it, hover over it, and you will be presented with the edit options:
- Edit – This option allows you to edit every single aspect of your tag.
- Quick Edit – This option allows you to edit only the name and the slug of the tag on the go. It is incredibly convenient as you can quickly perform changes without accessing the primary tag page.
We are going to introduce both editing methods. Depending on the case, you can select the most suitable one.
Edit #
The “Edit” option allows full flexibility while updating your tags. Upon clicking on the “Edit” link, you will be redirected to the tag page. The interface is exactly the same as for creating tags. You should be already well familiar with it and know your way around.
As you can see, you can edit the tag name, the slug, and the description.

When you perform the desired changes, please make sure to click on the “Update” button to apply them.
Quick Edit #
The “Quick Edit” option, on the other hand, is a real time-saver, and you will find it way more effective in certain situations. Upon clicking on the “Quick Edit” link, you will be presented with two fields allowing you to modify the tag name and the slug. Considering the fact you will remain on the same page, you will be able to edit what you need in an efficient and timely manner.

When ready, please click on the “Update Tag” button to apply the changes.
Now you are familiar with both methods of editing your tags, and you have the freedom to select the most suitable one based on what exactly you would like to change.
Deleting Tags #
While your website grows, you will get to a point when you need to remove some old and unneeded tags. To do so, you simply need to click on the “Delete” link when you hover over a specific tag.

Upon doing that, an alert will pop-up, and it will inform you the tag will be permanently deleted. To proceed further with the deletion, you have to confirm by clicking on the “OK” button.
With this done, the tag will be successfully deleted.
Please, bear in mind that once deleted, the tag will be removed from every single post, that it was attached to.
Bulk Deleting Tags #
In some cases, you might need to delete several tags at once. It will become really time-consuming if you have to remove them one by one.
Deleting tags in bulk is pretty much the same as manually deleting them. However, there are steps that differ.
By default, WordPress always lists only 20 items per page, whether they are tags, pages, categories, etc. With this in mind, you are limited to deleting up to 20 tags at once, which is not really practical in case you want to remove a lot more. Fortunately, you are able to modify that number and extend it up to 999 items. This is our first step.
At the top right corner of the “Tags” page, you are going to notice a “Screen Options” button. Upon clicking on it, it is going to be expanded.
Once this is done, you are going to be presented with several settings related to the appearance of this section. Please locate the “Number of items per page:” field under the “Pagination” category and enter the desired value into it.

When ready, please click on the “Apply” button to save your selection.
Now it is time to delete all unwanted tags. To do so, please tick the checkbox in front of “Name” positioned in the heading of the table.
This action will mark all tags currently displayed on the page. To avoid deletion of unintended tags, you simply need to uncheck the corresponding boxes.
When you are ready, please click on the “Bulk Actions” dropdown above the table and select the “Delete” option.
Afterward, please click on the “Apply” button positioned right next to the dropdown menu.
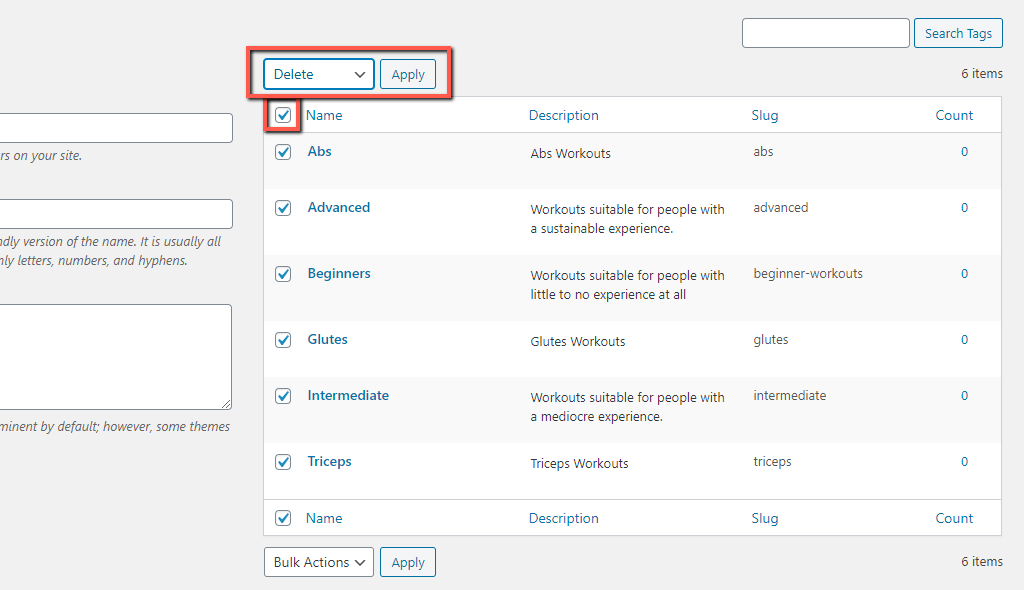
Once this is done, all selected tags will be permanently deleted.
Congratulations! Now you know how to fully manage your tags. You have learned how to browse the existing tags, the ways of editing them, and how you can permanently delete them. As you can see, these tasks are extremely simple and straightforward in the WordPress platform.


