Introduction #
Being able to generate backups for your hosting account, websites, or databases whenever they are needed is an invaluable asset. Whether you need an up-to-date copy of your site just in case something happens, you want to move to a different server or sell the website to a client, the “Backup” feature of the cPanel will prove to be really useful in these situations or any other endeavors you may have. In this tutorial, we will go over it, along with everything there is about it. In the end, you should be able to generate a backup of whatever you need on your cPanel. Thus without further ado, let’s get right into it!
Getting Started #
As with all of the cPanel features, in order to use the “Backup” feature, you need to log into your cPanel account.
After logging in, please look for the “Files” features group. Under it, you will notice an icon titled “Backup”. Please click it to get access to the aforementioned functionality.
Upon clicking on the “Backup” icon, you will be redirected to a new interface, allowing you to select the type of backup you want to generate.
Selecting Backup Type #
As mentioned in the introduction section of this tutorial, the “Backup” feature allows you to generate a few different backup types:
- Full Account Backup
- Home Directory Backup
- Database Backup
- Email Forwarders Backup
- Email Filters Backup
This feature also allows you to restore backups of the above. However, we will not discuss this functionality in this tutorial. We are going to be focusing mainly on the back generation aspect. We will be going over all of the backup mentioned above types in the following lines.
Full Account Backup #
Perhaps from the name, you could already tell that this functionality will allow you to generate a full account backup, also known as a cPanel PKG. This includes everything on the account – files, databases, emails, forwarders, DNS zones, domains, and sub-domains.
To be redirected to the screen, allowing you to initiate the full account backup generation, please press the “Download a Full Account Backup” button, located under the “Full Backup” section.
When you land there, under the “Generate a Full Backup” label, you will see a drop-down menu, two radio buttons, and a standard button. Let’s go over what they entail.
- Backup Destination – This dropdown will allow you to select the destination of your backup. The default choice is the “Home Directory”, which will place the backup within the home directory of your cPanel. Your other options are:
- Remote FTP Server – Selecting this option will start the backup process and then use FTP to transfer it to the remote server.
- Remote FTP Server (passive mode transfer) – This is completely analogic to the above, however, the FTP service will use passive mode for the transfer.
- Secure Copy(SCP) – This option will generate the backup, and then it will use SCP to copy the files over to the remote server.
Selection of any other choice other than “Home Directory” will open new text fields under the “Do not send email notification of backup completion” radio button that will require the following information:
- Remote Server – This text field requires you to type in either the hostname or the IP address of the remote server.
- Remote User – This text field requires you to type in the user on the remote server who will be receiving the backup.
- Remote Password – This text field requires you to type in the password of the user in the remote server.
- Port – Use this text field to type in the port for the respective service you are using – either SCP or FTP.
- Remote Dir – Please enter the directory on the remote server where the backup will be transferred.

These text fields are absolutely mandatory in order to start the transfer.
- Email Address – Selecting this radio button will activate the text field on its right side. It will allow you to define an email address that will receive a notification once the backup process is completed.
- Do not send email notification of backup completion – Please select this radio button if you do not want to receive notifications upon backup completion.
- Generate Backup – Finally, this button will start the entire process of backup generation and transfer (if such an option is selected).
For the purposes of this tutorial, we will use the “Home Directory” method, and we will select the “Do not send email notification of backup completion” radio button. After selecting your option and inputting the required parameters, please press the “Generate Backup” button at the bottom of the page.

If the request was accepted, you should be redirected to a new screen, indicating the backup generation is in progress.
To track the process, please press the “Go Back” button, located under the blue bar. This will take you to the previous page where you will see a line under the “Backups Available for Download” label, showing that the backup is currently in progress.
Note that the time required for backup generation varies based on the size. Naturally, smaller accounts will take less time to complete, while large accounts will need more. When the operation is complete, the line I mentioned above will be highlighted in blue and will become a clickable link.

Pressing on this link will start a download process, which will save the generated backup locally on your computer or device.
Home Directory Backup #
This backup type will generate a backup of all the files and folders located in your home directory of the account or, in short – all the files on your cPanel account. To initiate it, you need to click on the “Home Directory” button located on the “Backup” feature index page. It should be right under the “Download a Home Directory Backup” section.

Clicking on the “Home Directory” button will immediately open up a popup window which will let you choose the location to save the file locally on your computer.
Database Backup #
This functionality on the “Backup” page will let you download backups of the databases stored within your cPanel account. Underneath the “Download a MySQL Database Backup” section, you will find a table. Each row contains a database available on your cPanel account.
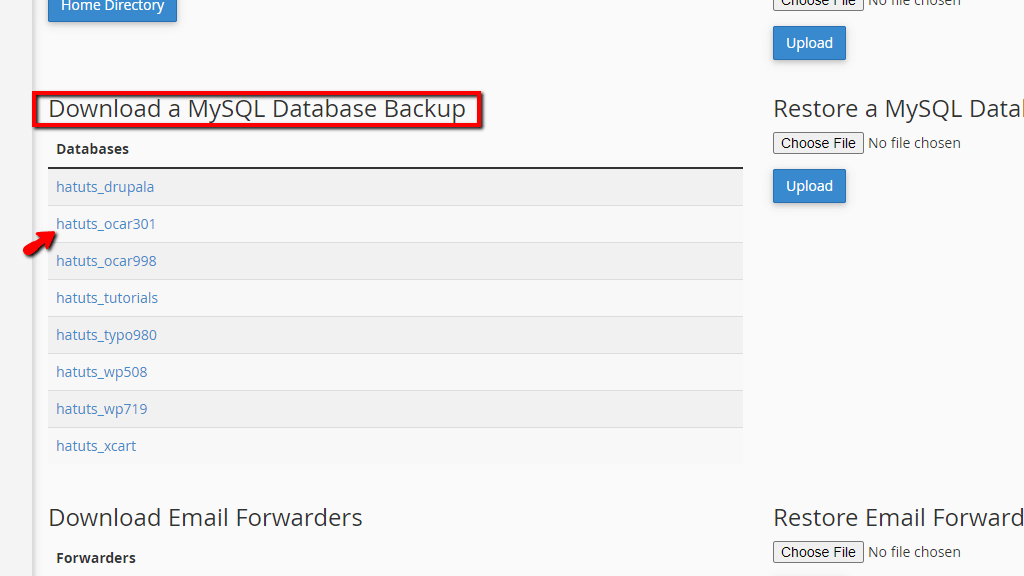
To download the desired database, please click on it. This action will open up a popup window, allowing you to select a location on your computer where to save the database backup.
Email Forwarders Backup #
This functionality on the “Backup” page will allow you to download a copy of the email forwarders you have set up. It is located directly under the “Download Email Forwarders” section. It is useful when you are utilizing a lot of email accounts that have a specific forwarder configuration. You should occasionally do a backup to ensure you can restore these forwarders if something goes wrong.

Inside a table section, you will see all your email accounts. To download the desired forwarder configuration, please click on the row corresponding to the email account you need. This process will open up a window, allowing you to choose a location on your local computer where to save the backup.
Email Filters Backup #
The last option you can take advantage of on this page is downloading a backup of the Email filters you created on the cPanel account. This works completely analogous to the above two and is located under the “Download Email Filters” section.

Inside a table section, you will see all your email account filters. To download the desired filter configuration, please click on the row corresponding to the email account you are interested in. This process will open up a window, allowing you to choose a location on your local computer where to save the backup.
There you have it! The “Backup” feature under the cPanel account gone over in the most simplified way! Hopefully, you found this information useful, and you are now able to utilize all its functionalities to generate the needed backups! If you are struggling with the feature, please do not hesitate to contact our technical support team over the ticketing system available in your Client Area. They are 24/7 available at your disposal.


