#
Introduction #
In the following guide, we will walk you through the entire process of configuring the WooCommerce Products Settings of your Online Store. The proper configuration of your settings is vital for your store’s effective functionality, therefore we will carefully review each of the available segments in the “Products” section. This tutorial will cover the general settings related to your products, display options, and inventory functionalities.
Getting Started #
The very first step we will need you to take will be to log in to your WordPress Admin Dashboard and navigate through the vertical left menu bar to WooCommerce > Settings.
Afterward, in order to switch to the Products Settings tab, please click on the “Products” button which you will locate at the top menu bar.
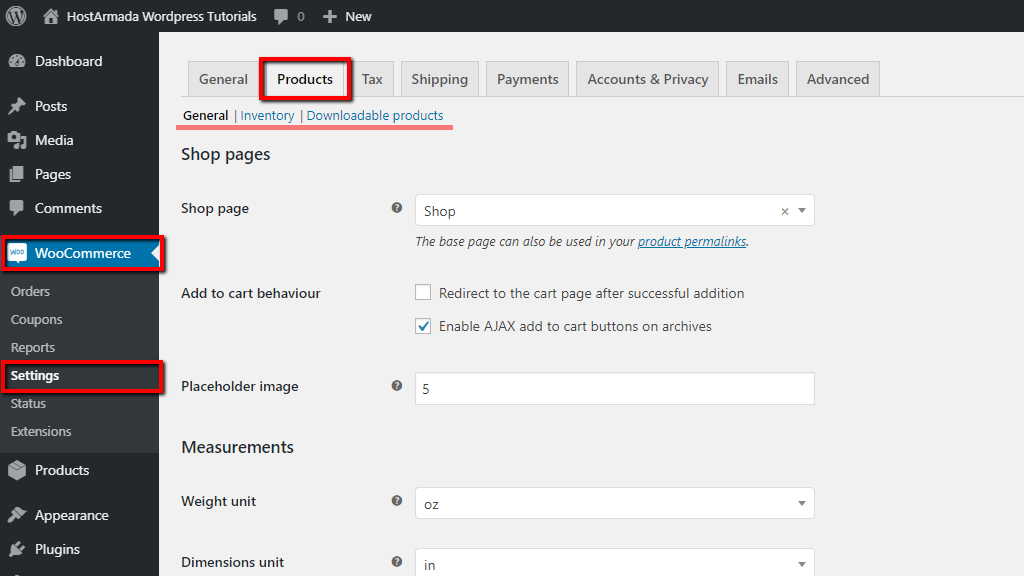
You will notice that the WooCommerce Products Settings are classified into three main sections: “General“, “Inventory“, and “Downloadable products“. In the following lines, we will separately review each of the sections and all their available options.
General Settings #
The General Setting Section is split into three segments: “Shop pages“, “Measurements“, and “Reviews“. Here from you will be able to configure your checkout, units and review preferences.
Shop pages #
With the first “Shop page” option, you will be able to determine which page you would like to configure as the default page of your store where your products will be listed. As you will notice at this point the default WooCoommerce “Shop” page is pre-selected – in case you would like to change it, please click on the dropdown menu and select your desired page.

The second “Add to cart behaviour” option will provide you with the following two selections:
- Redirect to the cart page after successful addition – If you enable this option, your customers will be automatically redirected to the cart page right after they successfully add an item.
- Enabled Ajax add to cart button on archives – As you will notice this is the pre-selected option, which will allow your customers to add items to their shopping carts while they are simultaneously browsing your website. This will become effective as the “Add to Cart” option will be enabled on all of your shop archive pages. We would like to suggest you stick with this option as in our humble opinion it will improve your users’ experience.

The last option of this segment is the “Placeholder image” which will allow you to specify the source (Attachment ID or URL address) of an image, which will appear in case there is no available image attached to a certain product.

Very well, now you have successfully configured your “Shop pages” settings and we are ready to move forward.
Measurements #
In this section, you will have to select the measurement units which will be used to define your products’ “Weight” and “Dimensions“.
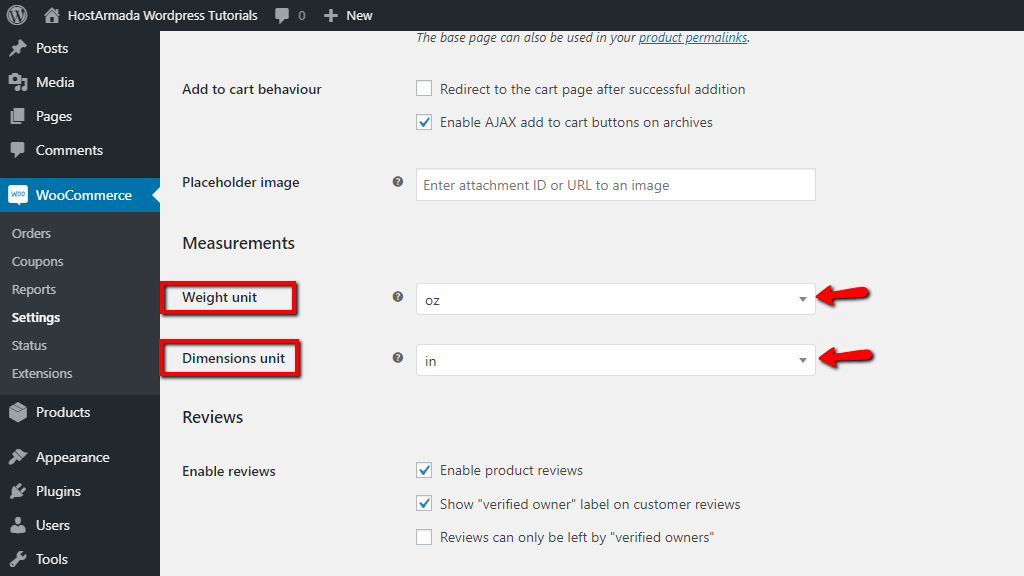
Please, click on the corespondent dropdown menu in order to select your preference.
Reviews #
In this last segment, you will be able to configure your “Reviews” and “Ratings” preferences.
From this first “Enable reviews” section, you will have to decide whether you would like to enable or disable the following three options:
- Enable product reviews – In case you would like your visitors to be able to leave reviews on your products, please leave this option ticket. Respectively, if you would like to disable the reviews option, please make sure to untick the box.
- Show “verified owner” label on customer reviews – If this option remains enabled, it will indicate whether the reviewer is your existing customer logged in their account at the time of leaving the review.
- Reviews can only be left by “verified owners” – In case you would like to restrict non-existing customers to be able to leave reviews on your products, please make sure to enable this option by ticking the box in front of it.
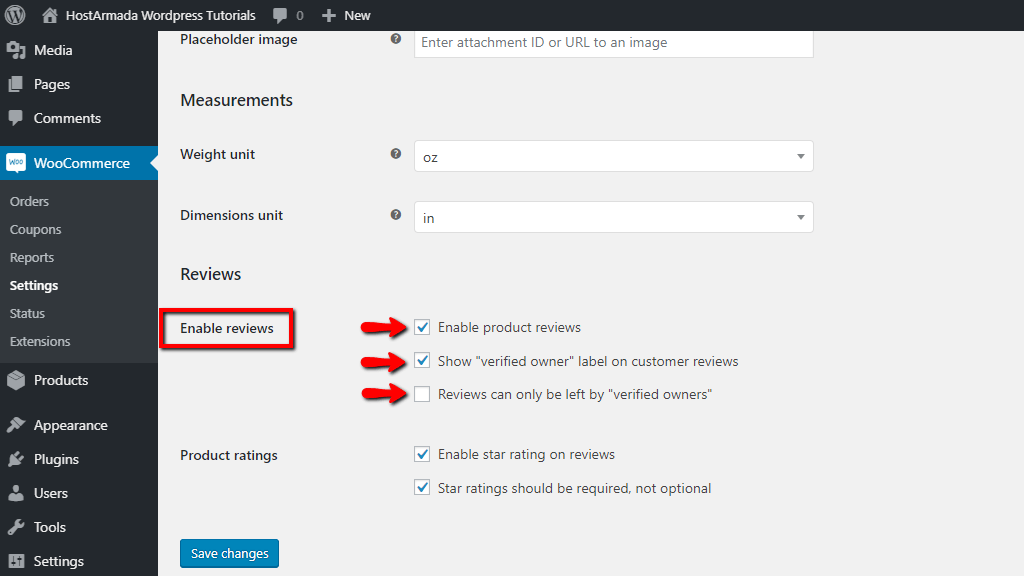
Under the second and last, “Product ratings” section you will see the following two options:
- Enable star rating on reviews – This option will include start rating on your reviews, therefore if you would like your reviewers to be able to rate your items, please make sure to leave the box ticked.
- Star rating should be required, not optional – If this option remains enabled, the visitors who leave reviews on your products will be required to also rate the product.

Now we have reviewed all the available options under the “General” section. As soon as you configure all your preferences, please do not forget to click on the blue “Save changes” button in order to successfully record them. If you are ready, let’s move forward to configuring the Inventory settings.
Inventory Settings #
Please, click on the “Inventory” button at the top of the page in order to switch to the “Inventory” tab and let’s review your product inventory settings.
As you will notice the “Manage stock” option is enabled by default – this is a WooCommerce functionality that will automatize the process of your inventory management. Your stock availability will be automatically managed and monitored, products’ quantity will be deducted based on your sales. Leaving this “Manage stock” option enabled will eliminate the need for monitoring your inventory and manually editing the number of your available stocks.

The “Hold stock” option allows you to specify a time limit (in minutes) for holding unpaid orders. As soon as the limit is reached unpaid orders will be automatically deleted. If you would like to disable this functionality and manually review and delete your unpaid orders, please leave the field blank.

Now let’s review your notification possibilities. From the “Notifications” option, you can select whether you would like to receive “low stock” and “out of stock” email notifications. Right below, on the “Notification recipient(s)” field you will need to specify your email address.

As you probably will guess from “Low stock threshold” and “Out of stock threshold” options, you will have to specify the number of products that will set off the respective status and consequently it will trigger the email notifications.
The last two options you will see are:
- Out of stock visibility – This option allows you to hide the items that are out of stock from your catalog. If you would like only your available stocks to be visible, please enable the option by ticking the empty box.
- Stock display format – From this option, you can select whether you would like the remaining quantity of the item to be shown on your website; the remaining quantity to be shown only when the item is in “low stock” status; or no quantity to be shown at all. Please click on the dropdown menu in order to select your preference.
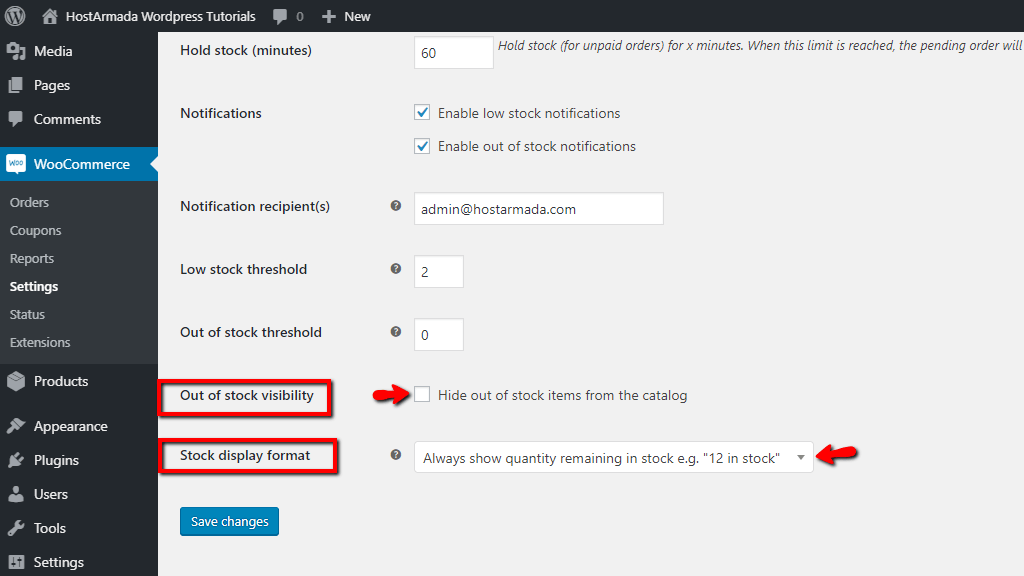
All the options in this section are quite straight to the point, therefore we are positive you will be able to easily configure them. Once again, as soon as you are ready, please do not forget to click on the blue “Save changes” button at the bottom of the page.
Downloadable products #
And finally, the last section of the “Products” settings bar. Please switch on it by clicking on the “Downloadable products” button at the top of the page.
In this section, you will be able to select the method which will control the process of downloading files from your website upon successful purchase. Please, click on the dropdown menu and choose one of the following options:
- Force download – With this option, the files will be “forced” to download through a PHP script. These downloadable files will not be accessible to anyone apart from the current purchaser, also the direct links will be hidden.
- X-Accel-Redirect/X-Sendfile – This option is similar to “Force download“, however, it is better suitable for larger files and increases the performance. Both X-Accel-Redirect and X-Sendfile are supported on our end and can be used to serve downloads.
- Redirect only – With this option the user will be linked to a download URL. Please, note that with this option your downloadable files will not be protected from unrestricted access.

The last “Access Restriction” provides two options as you will see. You can allow only currently logged-in visitors who have successfully processed the payment to be able to download your files from the “Downloads require login” option. “Grant access to downloadable products after payment” works pretty much the same, but your visitors will be able to download files while the payment is being processed.
As soon as you click on the “Save changes” button you are ready to go. At this point, you have your WooCommerce Products Settings successfully configured and you can move forward to configuring the Tax Settings. If you need any guidance, you can always take a look at our How to configure WooCommers Tax Settings tutorial.


