Introduction #
Plugins are an integral part of pretty much every WordPress based website. Even though the core features of WordPress are enough for running a simple website, you will undoubtedly need to install a plugin or two.
While they allow you to implement some essential features to your website, you need to be really careful with them. Having too many plugins can positively lead to security breaches, slow loading speed, poor performance, and even website inaccessibility. In such cases, you might need to provisionally deactivate specific plugins while you are troubleshooting your website. Furthermore, with attention to improving your overall website performance, it is strongly recommended to uninstall all plugins you are no longer using.
This will be the main topic of our tutorial. We are going to guide you on how to temporarily deactivate plugins and how to altogether remove unneeded plugins right through your WordPress Backend.
Accessing the Installed Plugins section #
For a start, please log into your WordPress Admin Dashboard. You can do that by accessing your domain followed by “/wp-admin“, i.e., “yourdomain.com/wp-admin“, where “yourdomain.com” stands for your actual domain name.
Once logged, please navigate through the left-hand side menu bar to Plugins > Installed Plugins.

Upon clicking on the “Installed Plugins” option, you will be redirected to a new page where you will find a list of all currently installed plugins. This is the section where you will be managing them in the feature development of your WordPress website.
Deactivating Plugins #
Plugins are known to occasionally cause inconveniences during and after updates. The deactivation function comes really handy when you are troubleshooting and debugging your website. You can use it to temporarily disable plugins you would like to continue using afterward.
First, you have to locate the plugin you intend to deactivate. To do so, you can browse through the list of all plugins. You can also list the plugins based on their current status – “Active“, or “Inactive” by clicking on the links at the top of the page. Alternatively, you can use the Search tool positioned at the upper right corner of the page.
Once you find the desired plugin, you have to simply click on the “Deactivate” link beneath it.

With this done, your plugin is successfully deactivated and moved to the “Inactive” plugins category. You can continue working on your website and activate it in the same manner as soon as you are ready.
Deleting Plugins #
In some cases, you would want to completely delete a plugin from your website. If you no longer need a particular plugin, it is strongly recommended to remove it altogether in order to avoid overburdening your website. The plugin deletion process is no different than the deactivation.
Note that you can delete only plugins that are currently deactivated. In case the plugin you wish to delete is still active, please refer to the previous section of this tutorial.
Once the plugin is deactivated, you will find a red “Delete” link beneath it. Naturally, you will need to click on it.
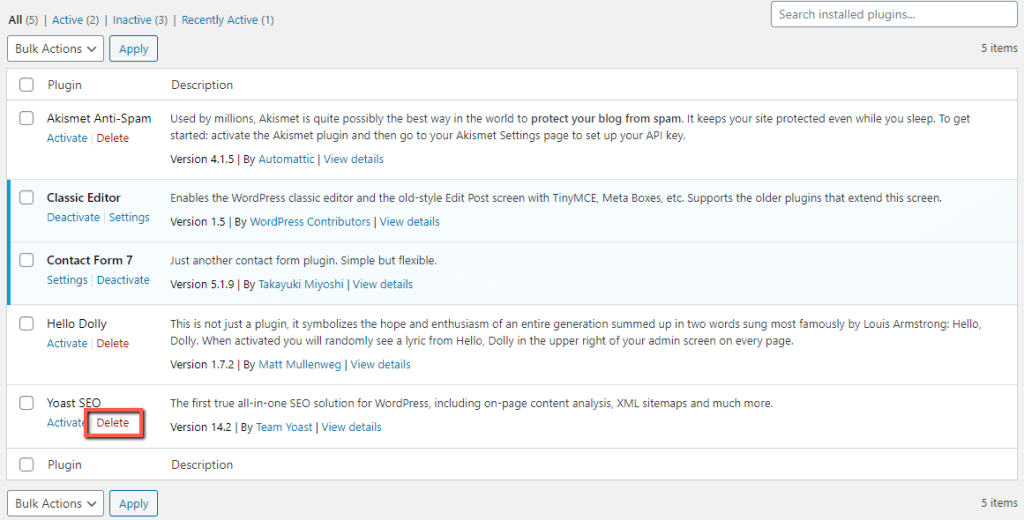
Upon doing that, a dialog window will be alerted, and you will need to confirm the plugin deletion by clicking on the “OK” button.
With this done, the plugin is completely deleted from your WordPress website.
Be aware that all of the plugin files will be permanently removed from your WordPress files directory, and you will not be able to restore them unless you have an independent backup copy.
Well done! Now you are familiar with the process of deactivating and completely removing plugins from your WordPress based website. We hope these new skills will come handy in the future management of your website and will help you to keep your website in a healthy condition.


