Introduction #
Whether you run a small blog or business website, it is always recommended to add a Privacy Policy. Nowadays, in most countries, you are required by law to have such. Considering thе fact, you will collect user information in one way or another, having a Privacy Policy displayed on your site is something you need in order to avoid interfering with legal laws and regulations.
The most common ways of collecting user information are through user registrations, contact forms, comment sections, Google Analytics, etc.
We know that it might sound challenging to have a legitimate Privacy Policy on your website. Fortunately, WordPress made this task as easy as child’s play.
In this tutorial, we will guide you on how to add your Privacy Policy page and how to display it in the Footer menu on your website. If you are ready to begin, let’s jump right into it!
Setting up the Privacy Policy page #
First, we will need you to log into your WordPress Admin Dashboard. You can do that by accessing your domain followed by “/wp-admin“, i.e., “yourdomain.com/wp-admin“, where “yourdomain.com” stands for your actual domain name.
Once logged, please navigate through the left-hand side menu bar to Settings > Privacy.

Upon doing that, you will be redirected to the “Privacy Settings” section. You will see that the default “Privacy Policy” page created by WordPress is pre-selected. If you want to go with it, you can click on the “Edit” link and customize the page as desired. Alternatively, you can click on the “Create New Page” button and ass a new one.

Both actions will redirect you to a standard page edition interface containing the default Privacy Policy template.
Upon performing the desired customization, you need to click on the “Publish” button positioned at the top right corner of the page.

Afterward, you need to go back to the “Privacy Settings” section, select the intended page from the dropdown menu, and click on the “Use This Page” button.

Once this is done, your selected page will be configured as the Privacy Policy of your WordPress website.
Displaying Privacy Policy page in Footer menu #
Now that you have the Privacy Policy page configured, it is time to display it on your website.
Privacy Policies are typically assigned to the Footer website menu. Note that you are welcome to display your Privacy Policy wherever you want on your site. Anyhow, we will stick to the common practice and show you how to add it to your Footer menu using widgets.
First, please navigate through the left-hand side menu to Appearance > Widgets.
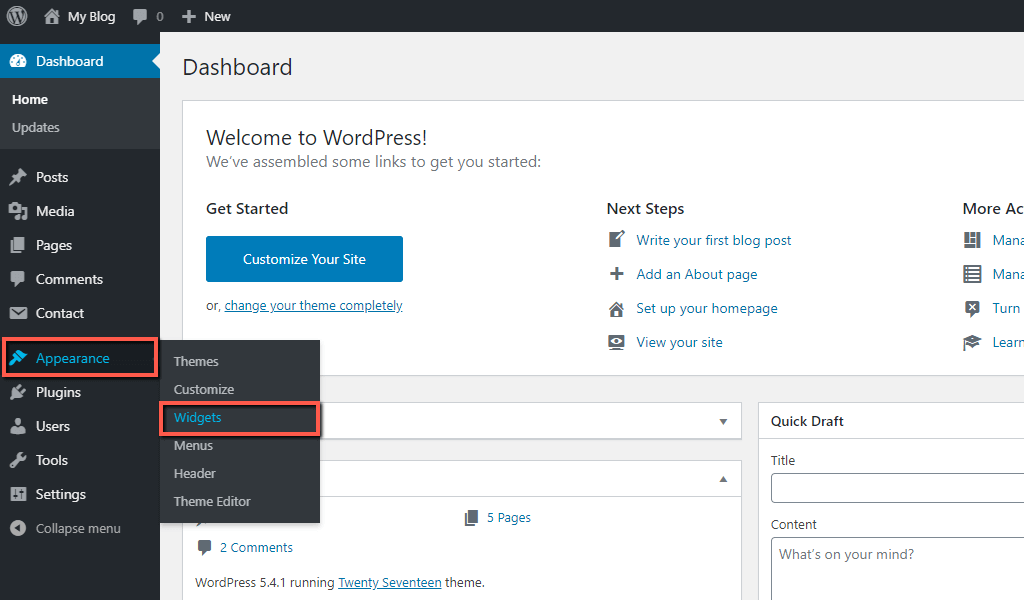
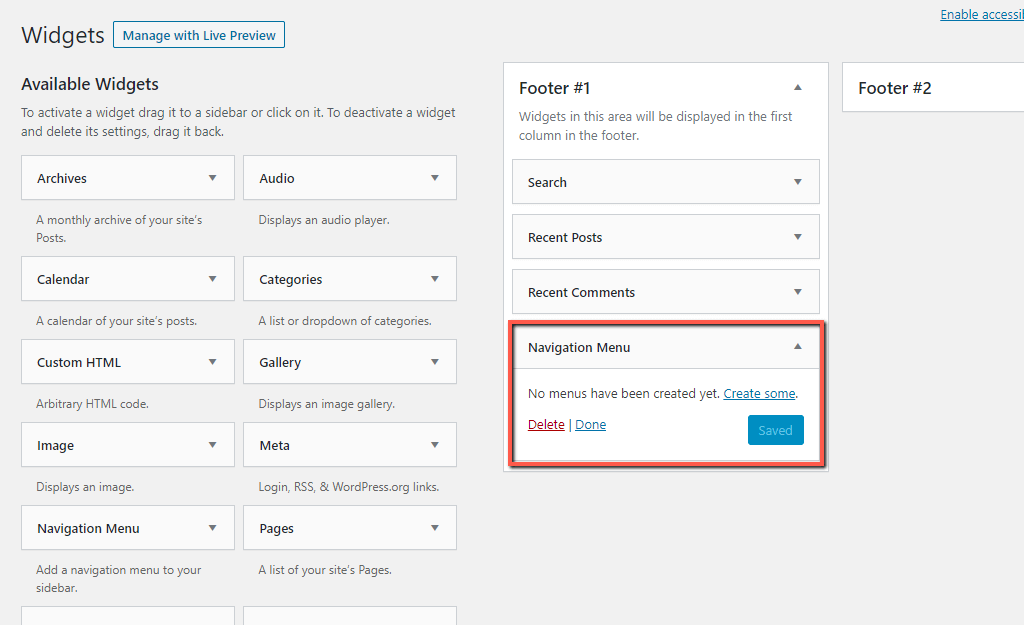
Upon doing that, you will be redirected to the “Widgets” management section. The left section presents the available widgets you can add to the widget-areas of your website. The right section consists of a few blocks which represent the actual widget-ready areas supported in the theme you are currently using. Note that, the widget-ready areas depend on your theme. Therefore, they may differ from our example. Anyhow, the process of adding the Privacy Policy page is generally the same.
Please click on the “Navigation Menu” widget from the left section and drag it to the desired widget-ready panel within the right section.

Once this is done, the Navigation Menu will be added to the corresponding area, and you will need to click on the “Create some” link. This will allows you to create a new menu on the go.
In case you already have menus created on your website, you will need to select one of your existing menus. With that been said, the Privacy Policy page has to be added to a currently available menu. Detailed information on the process of creating and configure menus you can find in our tutorial on How to create and manage the menus of your WordPress website.
Upon clicking on the previously mentioned link, you will be redirected to the menu creation interface. There you will be presented with a single empty “Manu Name” field where you need to enter the menu title. Once ready, please click on the “Create Menu” button.

Afterward, you will need to add the “Privacy Policy” page to the menu. To do that, please click on the “View All” tab under the “Pages” panel and select the “Privacy Policy” page by ticking the checkbox. When selected, please click on the “Add to Menu” button.

Once this is done, please click on the “Save Menu” button.
Now, please go back to the “Widgets” area. Expand the “Navigation Menu” widget in the “Footer” panel, enter the desired title, select the menu from the dropdown, and click on the “Save” button.

When you are ready, you can go to the website frontend and check the result.

And there you go! The Privacy Policy is displayed in the footer area of the website. Hopefully, you are pleased with the appearance on your end.
To sum up, in this tutorial, you have learned how to set up and display your Privacy Policy on the website frontend. We are positive you have managed to achieve the intended result, and we hope our instructions were useful to you.


