Introduction #
Keeping your system up to date is mandatory if you want to avoid being the target of malicious attacks and have the latest performance and stability updates for your system. WHM is the world’s most powerful hosting control panel and this requires a certain level of security and software update routines in order to meet today’s ever-growing IT standards. The internet is evolving really quickly and new exploits are created on a daily basis. The developers of WHM need to keep up with this growth and constantly release new builds and patches to keep their product to the expectancy level of their users. In this tutorial, we are going to talk about the WHM features that allow you to keep WHM itself updated and all software associated with it, along with any third-party features you installed. Let’s get started!
Accessing the Upgrade to Latest Version feature #
As with all other WHM control panel features you need to log into the WHM service for your VPS or Dedicated Server in order to access them. After you have logged in, please use the search field on the left side of the page and type “Upgrade to Latest Version”.

WHM will then show a single result underneath the search bar. All you need to do is click on it so that you are redirected to the “Upgrade to Latest Version” page.
Setting up your Update Preference #
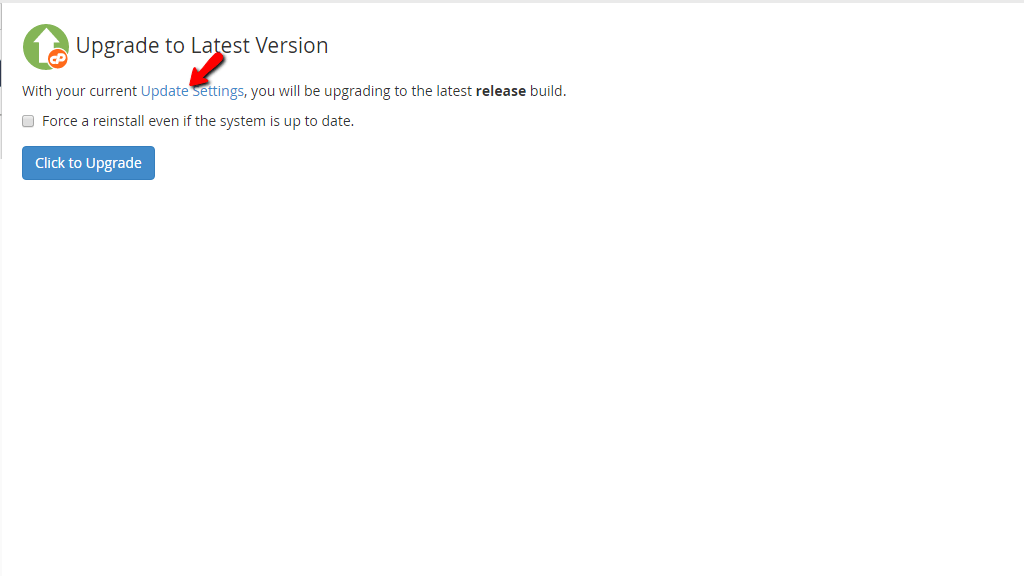
When you land on this page, you will see a message below the “Upgrade to Latest Version“ heading that will show the current settings in regards to the WHM build update preference. Please click on the “Update Settings” link so you can be redirected to the “Update Preference” page where you can define how your server handles its updates.
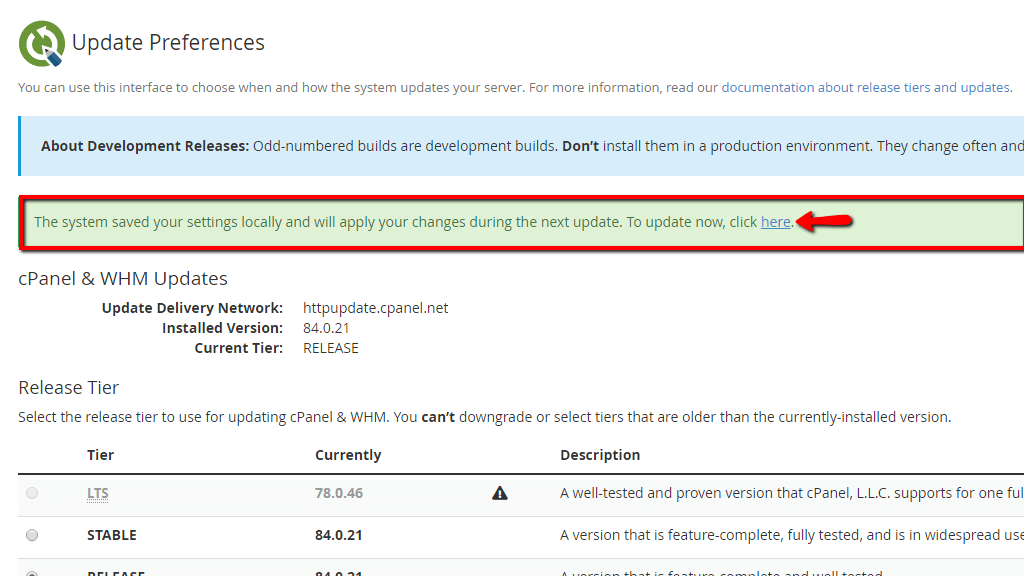
Upon being redirected to the “Update Preferences” page, on the top of the screen you will see a blue text box. It will explain that you should avoid odd-numbered builds for production servers at all costs, as they are development builds and are meant for testing purposes only. Below this text box, you will find the “cPanel & WHM Updates” section where your currently installed version along with the upgrade tier will be displayed.
In our case, we have chosen the “Release” tier which led to the next section to be called “Release Tier”. Underneath you will find a table section containing all of the available builds you can choose for your WHM server. In order to set the desired build, please select it with the radio button located on the left side of each tier. Note that you can not downgrade or select tiers that are older than the currently-installed version.

We recommend keeping this setting to the “RELEASE” tier, as it is a well-tested and feature-complete build.
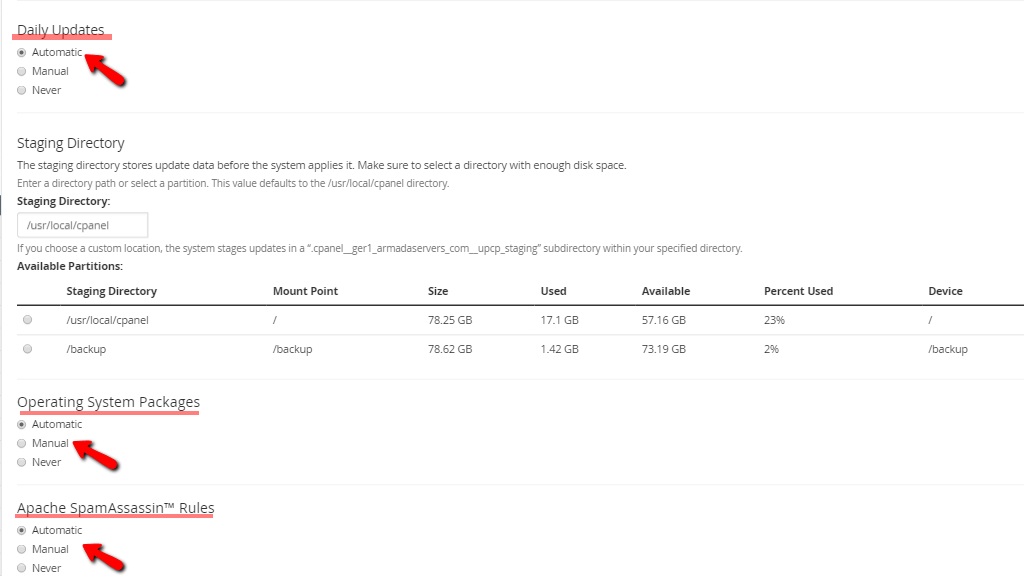
Under this table section, you will find the “Daily Updates” section. We recommend keeping this set “Automatic” as this ensures the best quality support and automatic upgrades to subsequent major versions of cPanel & WHM and will guarantee that you always receive the latest version, based on the selected tier.
One thing you should note is that the system will not install the update immediately upon its release. It will set a delay that can last up to a few business days before the process is started.
If you want to perform the upgrades manually or you wish to completely disable them, you may use the radio button and select one of the other two available choices “Never” or “Manual”.
Continuing downwards, you will reach the “Staging Directory” section. It will allow you to select a staging directory where you can store the update data files before the system applies them. We recommend keeping the default directory which is set to “/usr/local/cpanel”.
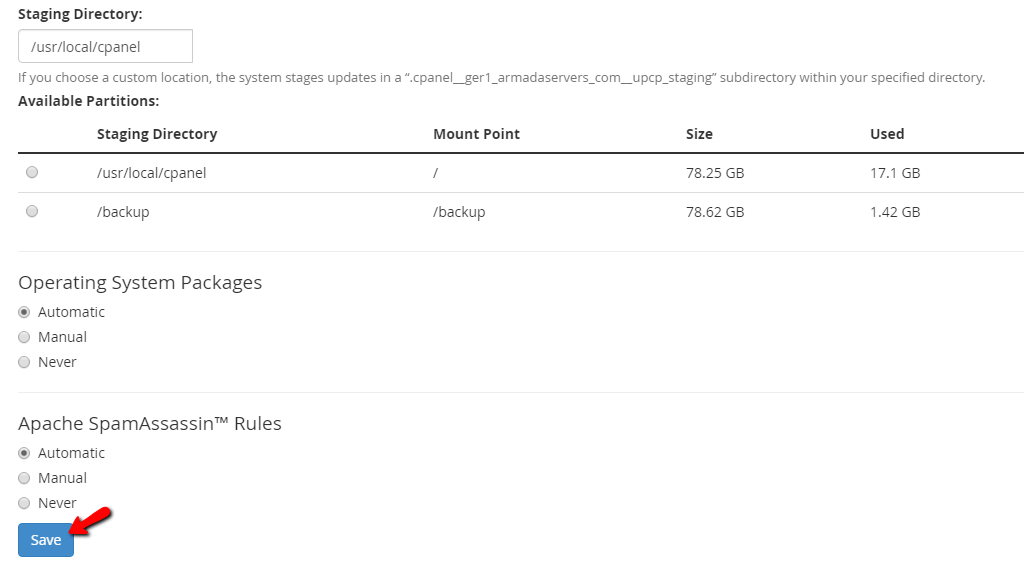
The last two sections allow you to choose if you want WHM to perform updates on the “Operating System Packages” and the “Apache SpamAssassin Rules”. The options are once again either “Automatic”, “Manual” and “Never”. A radio button is located on the left side of these choices and will allow you to pick the desired one. Our recommendation in regards to these options is to keep the updates “Automatic”.
Finally, when you have made the desired adjustments on the page in order to save them please press the “Save” button located on the bottom of the page.
You will be then taken to the top of the screen again and a green bar will notify you that the settings have been applied. This green bar will also contain a link “here” which you can use to go back to the “Upgrade to Latest Version” page.
Initiate the Upgrade Process
To initiate the upgrade itself, please press on the “Click to Upgrade” button below the “Force a reinstall even if the system is up to date.” checkbox.
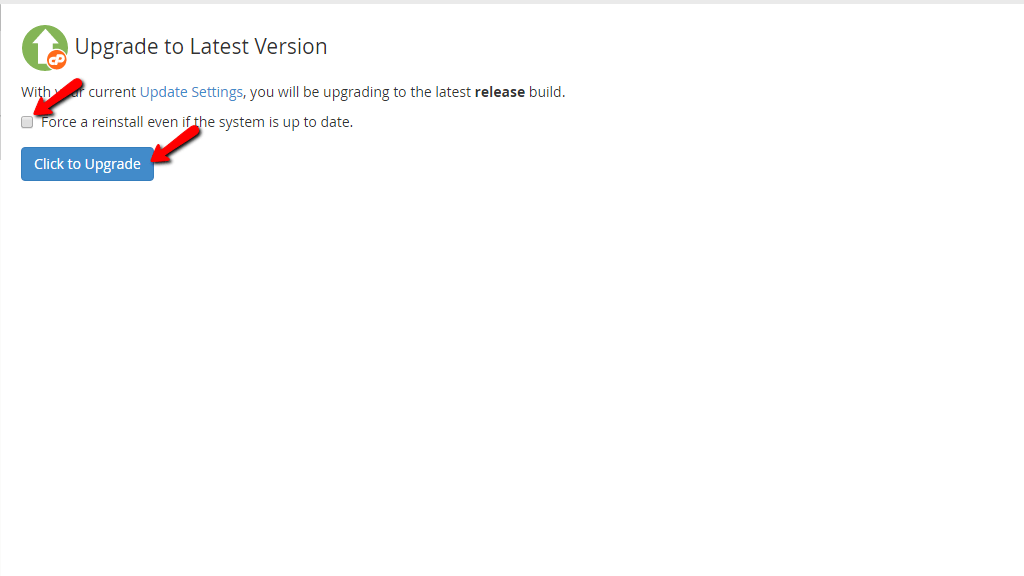
You may select this checkbox if you want a reinstallation to occur even if the system is already up to date. When you press the “Click to Upgrade” button, the upgrade process will be initiated.
WHM will then present you with a progress bar to track the upgrade process and a log in which you will find useful information on the progress of the update.
Perform a System Update #
The “System Update” is a WHM feature that will allow you to update all of the packages on your server to their latest version. Note that this will also perform an update to all the packages of third-party software that you have installed on your server. Additionally, this update could also remove RPM packages that the system does not need for the update or that are in conflict with your update request. In order to access it, please use the search bar of the WHM Control Panel and type in “System Update” so WHM can present you with the correct feature.
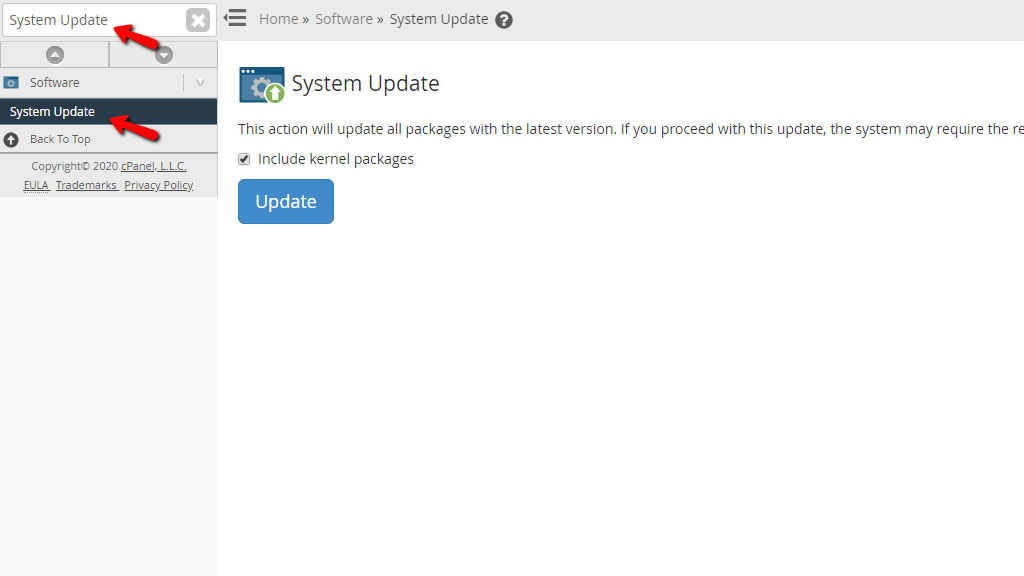
When you click on the feature you will be redirected to a new page where you will see the “Include kernel packages” checkbox. If you select it, you will also update all the packages associated with the kernel of your server.
Please note that if this is chosen and updates have been made to the kernel’s packages, a server reboot may be required afterward so that they are applied.

In order to start the update process itself, please press the “Update” button underneath the “Include kernel packages” checkbox.
Manually update your Server’s Software #
The WHM Control Panel provides you with the option of upgrading all of the dependencies it has in terms of OS vendor and cPanel-provided software packages. Occasionally, these dependencies are upgraded by their providers to enhance performance, improve functionality or mitigate security risks. Ordinarily, all of these updates will be triggered when a WHM automatic update occurs, however, if for some reason these are disabled for your server, you may end up missing a lot of updates.
We HIGHLY recommend going through the “Update Preferences” feature on your server that was explained at the beginning of this tutorial and make sure that the “Automatic” option is selected to ensure the regular update of your system. If, however for some reason you prefer doing this manually, WHM provides you the option to do so through the “Update Server Software” page.

In order to initiate this process, please press the “Proceed >>” button that will be located on the bottom right corner of the section.
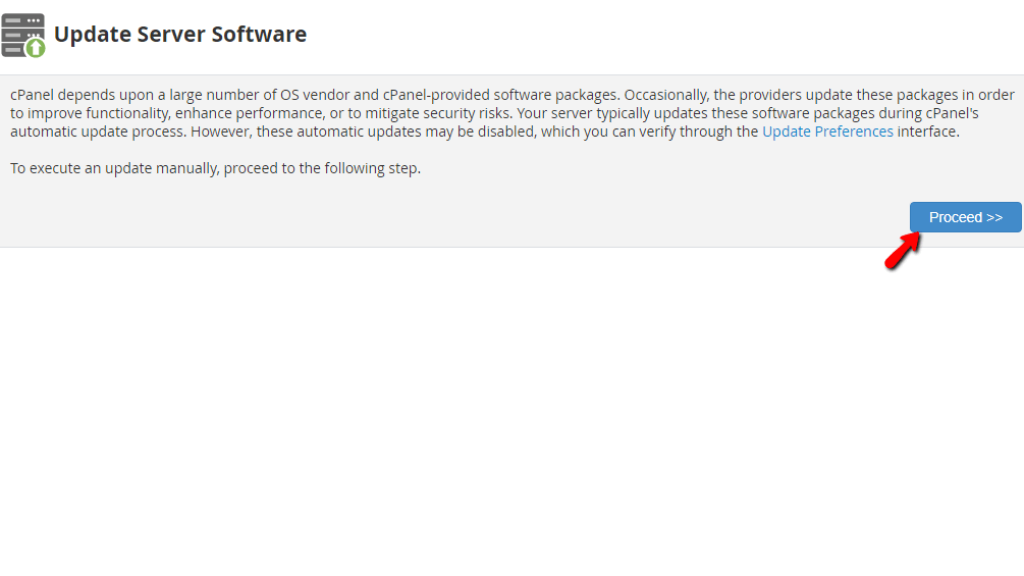
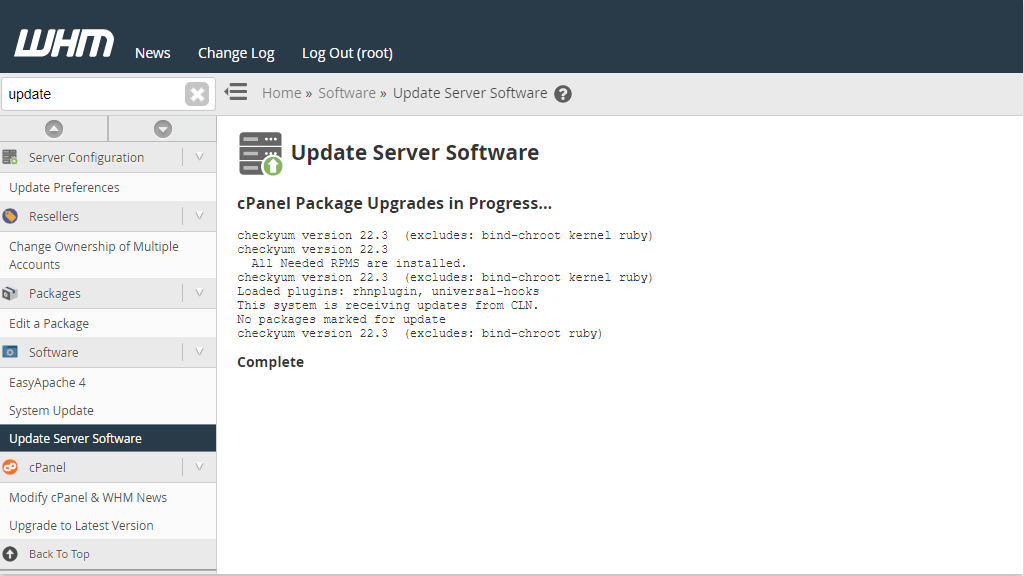
When this button is pressed, a changelog will appear containing information about the updates it did. At the bottom of this log, you should expect a “Complete” message if the update went through.
There you have it! All of the features allowing you to update the system on your WHM server. All of these features are responsible for the different software of the big ecosystem which WHM is and they provide you with the flexibility to define the way you want the updates process to occur, be that manually, automatically or never. If you have any questions regarding any of them, please, do not hesitate to contact our Technical Support Staff through the ticking system in your Client Area.


