Introduction #
The abbreviation “DNS” stands for Domain Name System and it is used to translate domain names into IP addresses, so any pair of computer systems can communicate with each other.
The DNS Zone of a domain name contains small pieces of information known as DNS records. They are used to provide information to the DNS service in order to show a website, send or receive an email, etc.
The DNS Zone of a domain name is just a small plain text file stored on the Web Hosting Server to which your domain name is being pointed to by its nameservers. It is managed by a specific organization – typically a Web Hosting Company like Phluit.
When a domain is being used to access a website your web browser submits a query towards the DNS zone of the accessed domain using your local DNS service. This query should be then answered by the Web Hosting Server where that DNS zone resides. The DNS record set in the DNS zone provides the correct IP address of the accessed website. With that piece of information, your web browser knows where to send the web requests and the cycle of communication begins until the website is finally rendered.
Now that you know how the DNS service works you are ready to explore the newly added “DNS Zone Manager” feature in version 86 of the WHM control panel. It will allow you to edit the records inside the DNS zones of domains hosted on your server. In this guide, we will be taking a closer look at the “DNS Zone Manager” functionality and also provide you with information about the various DNS records that you can add or change. Let’s begin!
Accessing the DNS Zone Manager feature #
First, you need to log into the WHM service for your VPS or Dedicated Server. After you have logged in, please use the search bar on the left side of the page and type “DNS Zone Manager”.
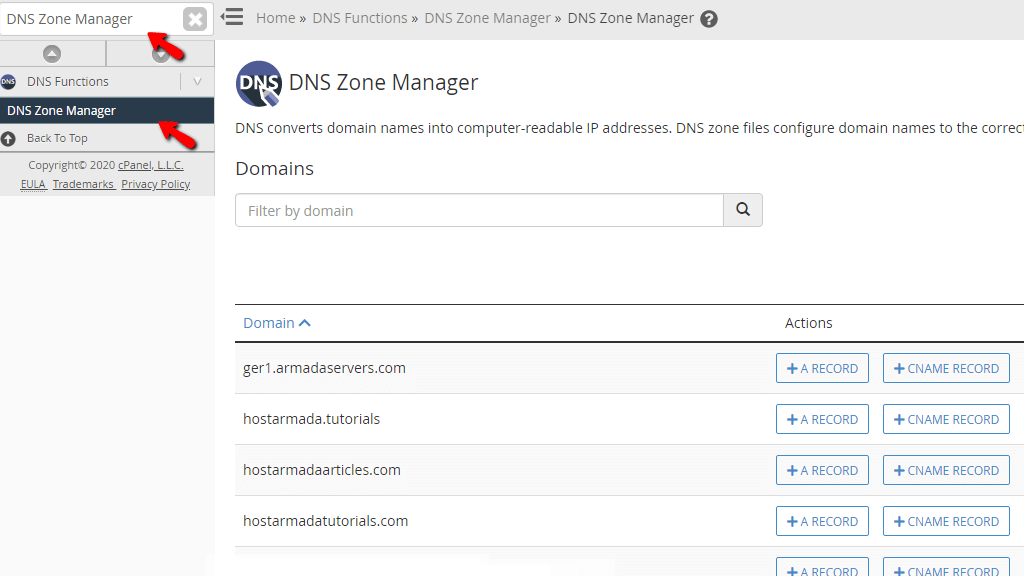
When you click on the first result presented by the WHM, you will be immediately redirected to the “DNS Zone Manager” page where you will notice a search bar below the “Domains” heading.
Adding common DNS records #
Please use the search bar to filter out the DNS zones on your server and find the one you want to either add a record to or edit.

Underneath the search bar, you will find a list containing domain DNS zones and various action buttons that you can use to add different types of DNS records. Let’s go over all of them.
- + A RECORD – This option is represented by a button. When pressed, the option allows you to add an A record to the domain’s DNS zone.
- + CNAME RECORD – This is another option represented by a button and upon clicking on it, you will be able to add a CNAME record to the domain’s DNS zone.
- + MX RECORD – This is yet again another button that will let you add an MX record to the DNS zone of the domain.
- MANAGE – The last button in this row will open a completely new page with various settings on it, thus we will be looking at this functionality in greater detail in the next paragraphs to follow.
Adding an A record
Before we explain how to add this record to a DNS zone, let’s first go over what it actually does.
The A record or the IPv4 Address Record will map a hostname to an IPv4 address. These records will allow DNS servers to identify and locate your website on the Internet. If your website is utilizing an A record that does not resolve to a server that has a working web service on it, such as Apache, your visitors will not be able to access your website.
To add an A record to a given domain’s DNS zone using the “DNS Zone Manager” in the WHM control panel, please press the “+ A RECORD” button located inside the corresponding row. When pressed, this will open a popup window with two text fields – the “Name” text field and the “Address” text field. Please type in the record’s name and IP address in the “Name” and “Address” fields respectively.

When you finish typing in the requested information, please press the “ADD AN A RECORD” button located on the bottom of the popup window.
Adding a CNAME record
Before we explain how to add this record to a DNS zone, let’s first go over what it actually does.
Canonical Name Records or shortly CNAME records are used to create aliases for other domain names that have a working DNS service. You may use it to map your domain to a hostname instead of an IP address.
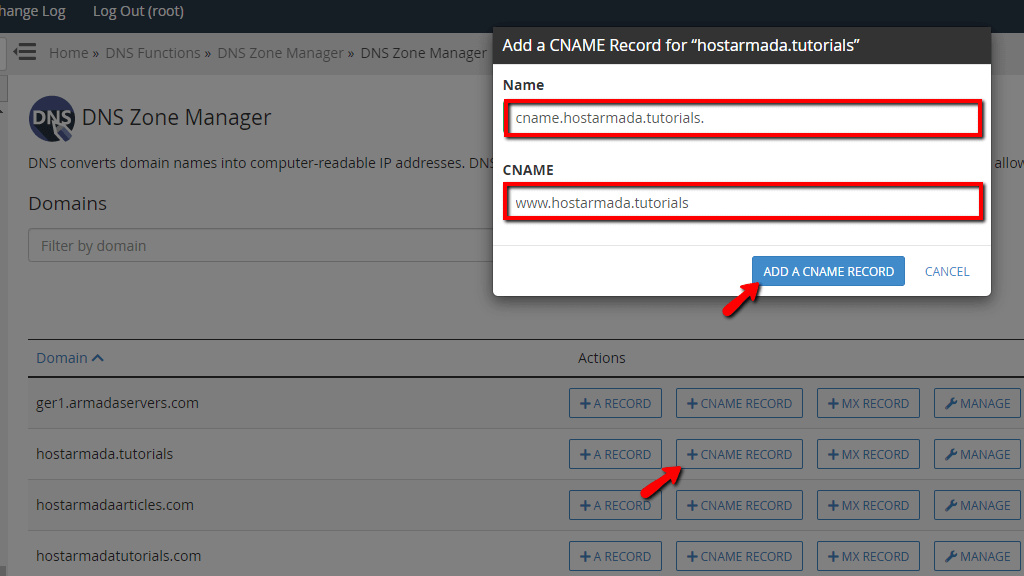
To add a CNAME record to a given domain’s DNS zone using the “DNS Zone Manager” in the WHM control panel, please press the “+ CNAME RECORD” button located inside the respective row. When pressed, this will open a popup window with two text fields – the “Name” text field and the “CNAME” text field. In order to add the CNAME record, please type in the record’s name and CNAME hostname in the “Name” and “CNAME” fields respectively.
Adding an MX record
Before we explain how to add this record to a DNS zone, let’s go over what it is used for.
The Mail Exchanger or the MX record maps the whereabouts of the domain’s mailboxes. Changing this will control where your incoming mail is being delivered. It is defined by two parameters, the priority, and the destination. The priority needs to be an integer value and it will define which is the main mail server. The lower it is, the higher the priority level of the server will be. For example, a value of 0 will mark the server with the highest priority level and your emails will be delivered there. The destination will represent the mail server. This must be a fully qualified domain name (FQDN).
To add an MX record to a given domain’s DNS zone using the “DNS Zone Manager” in the WHM control panel, please press the “+ MX RECORD” button located inside the corresponding row. When pressed, this will open a popup window with two text fields – the “Priority” text field and the “Destination” text field. In order to add the MX record, please type in the record’s priority, and the destination in the “Priority” and “Destination” fields respectively.

Managing and Editing the domains DNS zones on the server #
To open this functionality, please press the “Manage” button located on the row corresponding to the domain’s DNS zone you want to manage.

Upon being redirected to the “Manage” page you will see a search bar on the top side, allowing you to filter the DNS records based on their domain name. Additionally, you will be able to filter them by their type using the clickable links corresponding to each DNS record type.
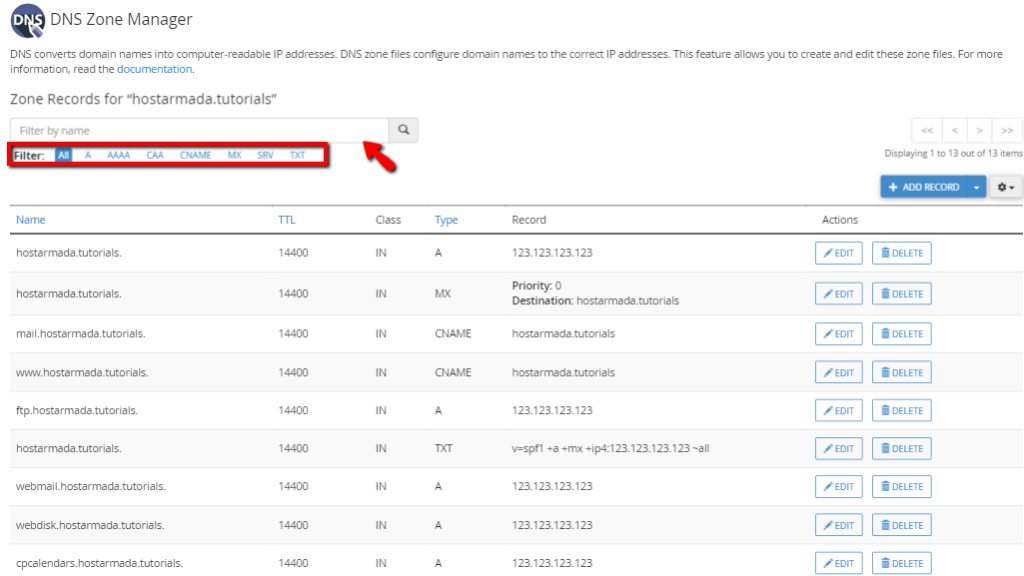
Beneath the search bar, you will find a table section containing all of the DNS records within the selected DNS zone. Let’s go over all of the columns and what they contain.
- Name – The name of the record. The values here are any valid domains/subdomains.
- TTL – Time To Live. This value indicates how long your DNS record will be cached by the Recursive nameserver.
- Class – This is the namespace where your DNS record lives. Typically here you will see only the IN value which is an indicator for the Internet namespace.
- Type – This will display the type of the record. For instance, CNAME, A record, MX record, etc.
- Record – This will show the value of the DNS record. Depending on the record’s type, the value can be either a domain name, an IP address, a text value, or an integer value.
- Actions – This will provide various actions you can perform with the displayed records. In this case, you can either “Edit” them or “Delete” them. We will go over what these options do and how to use them below.
Edit a DNS record
In order to edit a DNS record, please press the “Edit” button located on the row corresponding to the DNS record you want to alter. Upon pressing the “Edit” button, the row will be highlighted in blue and you will be able to change all of the values inside with the exception of the “Class” value.
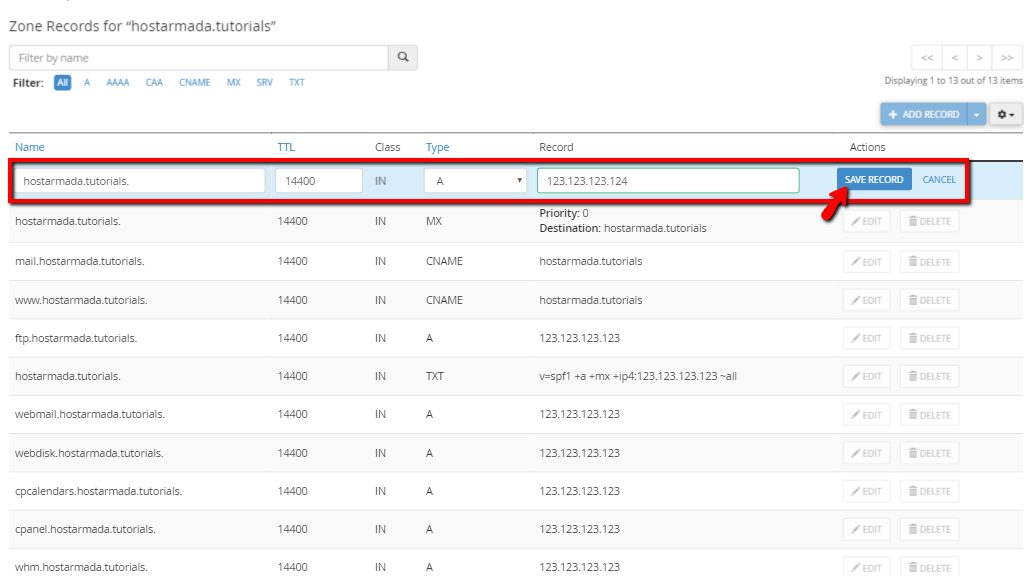
When you are ready with the edits, please click on the “SAVE RECORD” button.
Delete a DNS record
The final action you can take with a DNS record is to delete it. Please bear in mind that deleting a DNS record will permanently remove it from the DNS zone of your domain name. DNS records cannot be restored and the only option you will have in order to restore the deleted DNS record will be to add the record anew.
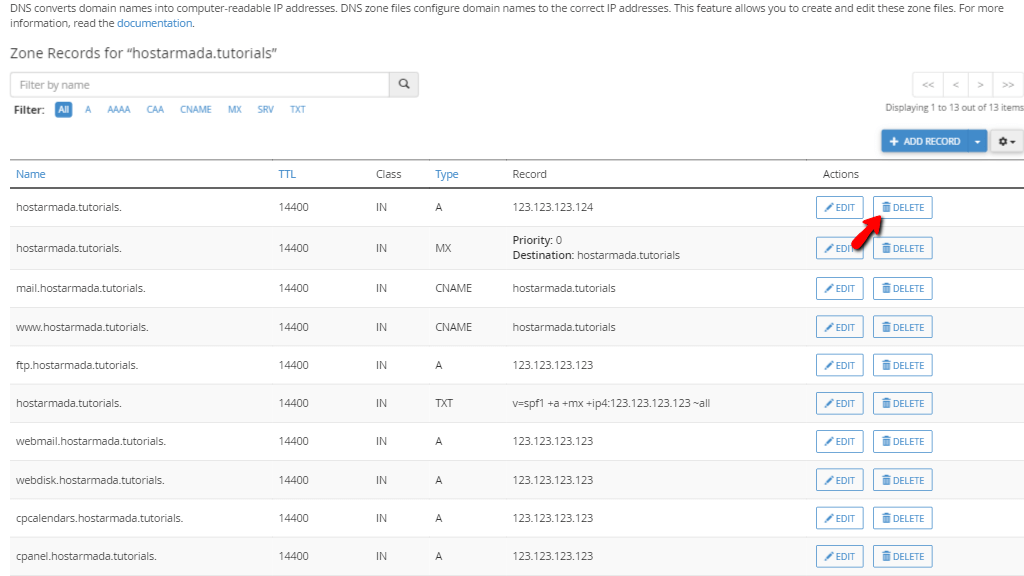
To remove a DNS record, please click on the corresponding “DELETE” button.
Adding other DNS records to your domain DNS zones #
The last option on this page we are going to explore is the “+ ADD RECORD” functionality. It will allow you to add the records we went over in the previous paragraphs, along with other, more specific ones, which we will explain shortly. In order to access this functionality, please press the “+ ADD RECORD” dropdown located on the far right side of the table section.

Add “AAAA” record
This record is absolutely analogical to the A record, however, instead of mapping domain names to IPv4 addresses, it maps them to IPv6 addresses. In order to add this record, please click on the “ADD RECORD” dropdown located on the far right side of the table section and select “Add “AAAA” record”
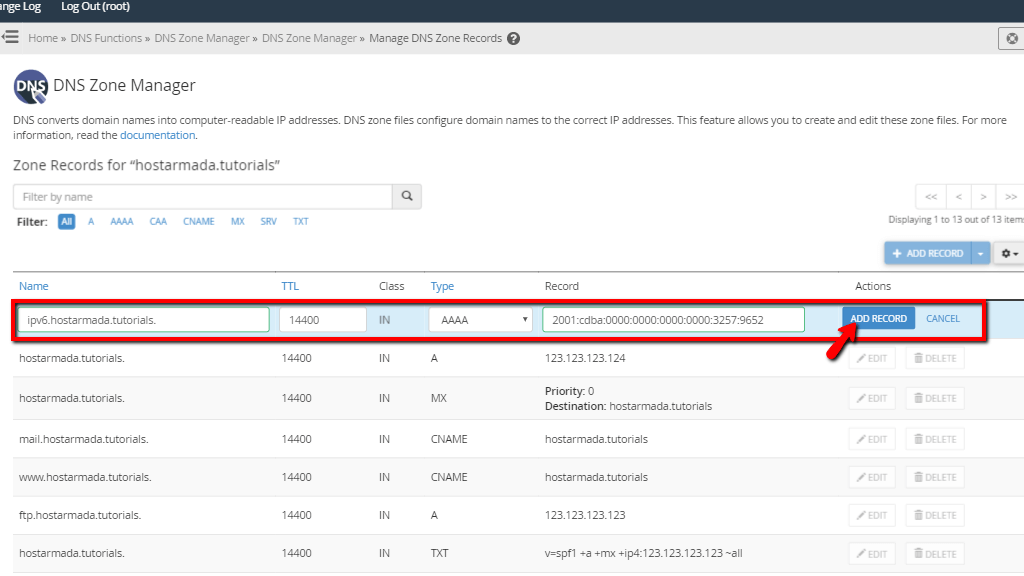
When you have typed in the name and the record, please click on the “ADD RECORD” button under the “Actions” column
Add “CAA” Record
This record type will control the Certificate Authorities (CA) that can issue an SSL certificate for a given domain name. In order to add this record, please click on the “ADD RECORD” dropdown located on the far right side of the table section and select the “Add “CAA” record” option. It will be defined by the following configuration options.
- Flag – This will have a value of either 1(Critical) or 0(Non-Critical). It will let the CA (Certificate Authority) know if it should issue an SSL in case the record itself contains an unknown property tag. This leads us to the next option.
- Tag – This is the Type of CAA record. It can have 3 options: issue, which will authorize the CA to issue a personal SSL for the domain; issuewild – this will authorize the CA to issue a wildcard SSL for the domain; iodef – this will specify a URL to which a CA may report policy violations.
- Value – This will contain the CA’s domain or URL if the iodef option is selected.
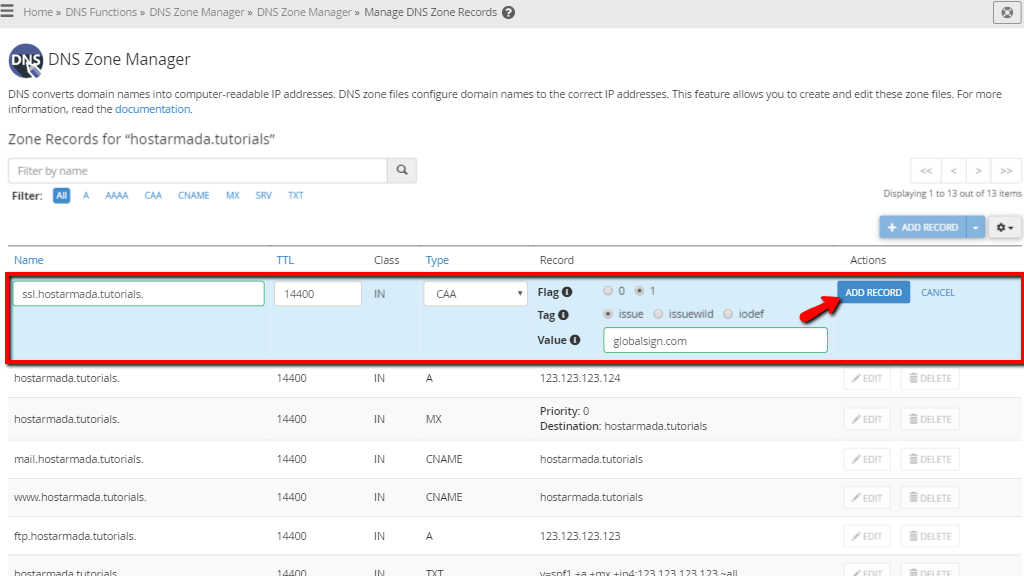
When you have entered the requested information, please press the “ADD RECORD” button located under the “Actions” column.
Add “TXT” record
This record contains text data that is typically used by services that are associated with the domain name. For example, the TXT record can specify data for SPF, DKIM or DMARC records. We will discuss the DMARC record specifically in the next paragraph to follow. In order to add this record, please click on the “ADD RECORD” dropdown located on the far right side of the table section and select “Add “TXT” record”
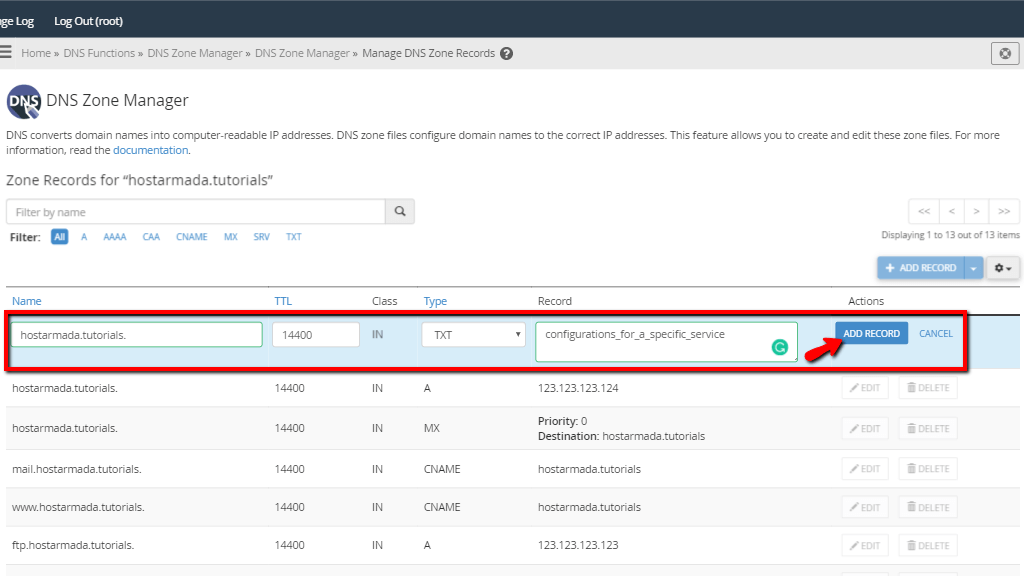
When you have entered the requested information, please press the “ADD RECORD” button located under the “Actions” column.
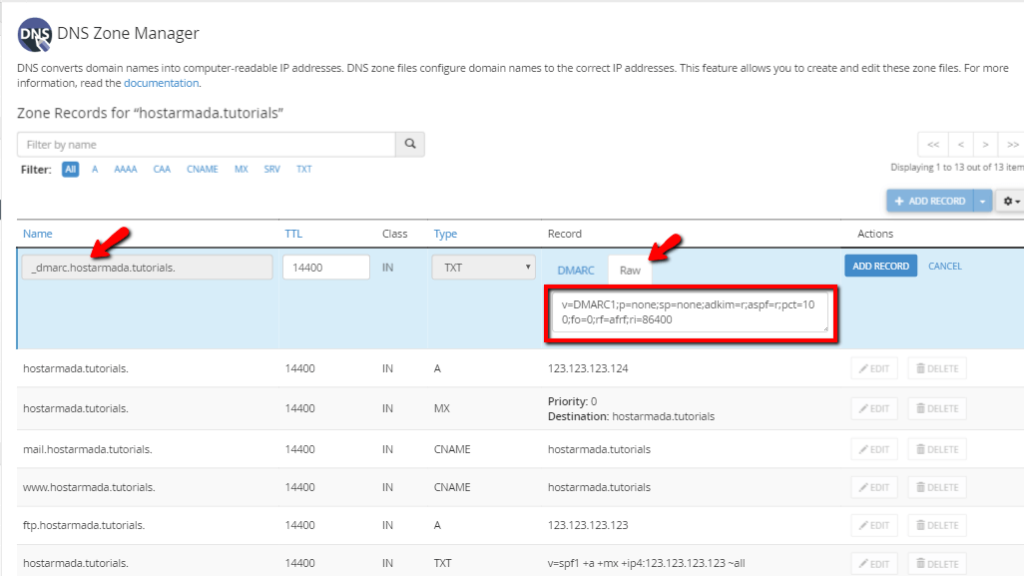
Add “DMARC” record
The Domain-based Message Authentication, Reporting, and Conformance or DMARC record indicates what action a mail server takes when it receives an email from a domain that fails SPF record and DKIM record checks. In order to add this record, please click on the “ADD RECORD” dropdown located on the far right side of the table section and select the “Add “DMARC” record”. When added this will be a plain TXT record to which WHM will apply default values. You may view that by pressing the “Raw” tab located under the “Record” column when you deploy the record.
If you select the “DMARC” tab, located on the left side of the “Raw” tab, you will open quite a big settings screen, which you can configure to your liking.
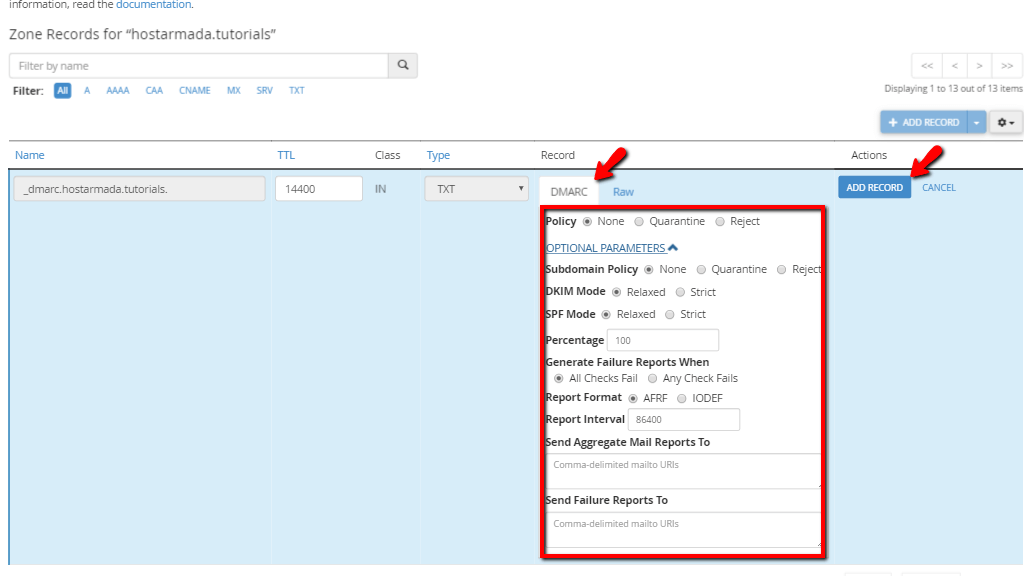
Let’s go over all of the configurations inside this tab.
- Subdomain Policy – The action you can expect from the mail server when it receives an email from the domain’s subdomain. The server only takes this action if the email fails its SPF and DKIM checks, as explained earlier. You can either take no action, reject the mail or quarantine it. Please use the radio button on this row to select the desired outcome.
- DKIM Mode – The DKIM level, which the record will enforce for the domain. This will check if the email has a valid DKIM signature and will act based on the mode you set. It can be either “Relaxed”, which will accept mail even if the email comes from a sub-domain of the domain defined inside the DKIM record or “Strict” which requires the domain name in the DKIM record to match EXACTLY. Please use the radio button on this row to select the desired outcome.
- SPF Mode – This is completely analogical to the above, with the difference that it will enforce SPF level signatures, instead of DKIM. Please use the radio button on this row to select the desired outcome.
- Percentage – This text field can be used to enter the percentage of emails that you want the server to filter.
- Generate Failure Reports When – The purpose of this option is to report any DMARC encountered failures in real-time. You may choose two options here – “All Checks Fail” or “Any Checks Fail”. Please use the radio button to select how you want the failed reports to behave.
- Report Format – Please use this radio button to select the format that the server utilizes to report an email’s possible spam status.
- Report Interval – Please type in the text field the amount of time in seconds that pass between each email report.
- Send Aggregate Mail Reports To – In this text field, please type in a comma-separated list of URLs to which to send the assembled reports. If the URL does indeed include a comma, you must URI-encode the comma.
- Send Failure Reports To – Please write down a comma-separated list of URIs to which to send failure email reports in this text field. You should follow the syntax shown in the previous bullet point.
When you have entered the requested information, please press the “ADD RECORD” button located under the “Actions” column.
Add “SRV” record
With this record, you can provide data to services listening on specific ports on a remote server. You can configure the following options for this record type:

- Priority – Please enter an integer value in this text field. The priority is completely analogic to the priority explained in regards to the MX records. The lower the integer number, the higher the priority level will be for this service.
- Weight – Please enter an integer value in this text field. This is an additional level of control for the priority configuration option. If two SRV records have the same priority but one of them has a lower weight, the one with the lower will be ranked higher and selected by the server.
- Port – Please enter an integer value in this text field. Define the port on which the service is working on the target server.
- Target – Please enter the hostname of the target server service. This should be a fully qualified domain name (FQDN).
When you have entered the requested information, please press the “ADD RECORD” button located under the “Actions” column.
That’s it! All the functionalities that the “DNS Zone Manager” feature in the WHM control panel offers. We hope that the provided information regarding the various DNS records will come in handy when setting them up as they can be truly useful when configuring your server to use various services. If you need help setting a DNS record for your server’s DNS zone and you are unable to do this on your own, please, feel free to contact our Technical Support Team. They are 24/7 available through the ticketing system in your Client Area.


