Introduction #
The “Customization” feature of the WHM Control Panel will be of particular interest to you if you are a Reseller. Basically, what it lets you do is add your brand to cPanel and Webmail so your clients can not associate the service with the provider you purchased the server from. This will also provide a more professional look for your company. Another thing this functionality lets you do is to change the style of your cPanel layout for your users. Additionally, it also lets you modify your company’s public contact information. In this tutorial, we will be going through all the customizations you can do using the “Customization” feature in the WHM control panel. Let’s get started.
Accessing the Customization feature #
First, you need to log into the WHM service for your VPS or Dedicated Server. After you have logged in, please use the search bar on the left side of the page and type “Customization”.

When the functionality shows up below the search bar, please click on it so you can be sent to the “Customization” page.
Customizing your cPanel #
Upon landing on this page, the first thing you will notice are three tabs. “Customize Branding”, “Customize Style” and “Public Contact”. The default choice will be the “Customize Branding”, so let’s explain what it contains.

The first text field you are going to come across is the “Company Name” field. In order for the WHM Control Panel to apply your company name instead of the default cPanel information, please enter your company name here. The next text field will request that you type in the “Help Link”. We recommend setting up the URL for your company website or knowledgebase. Finally, the last text field will ask you to type in the “Documentation Link”.
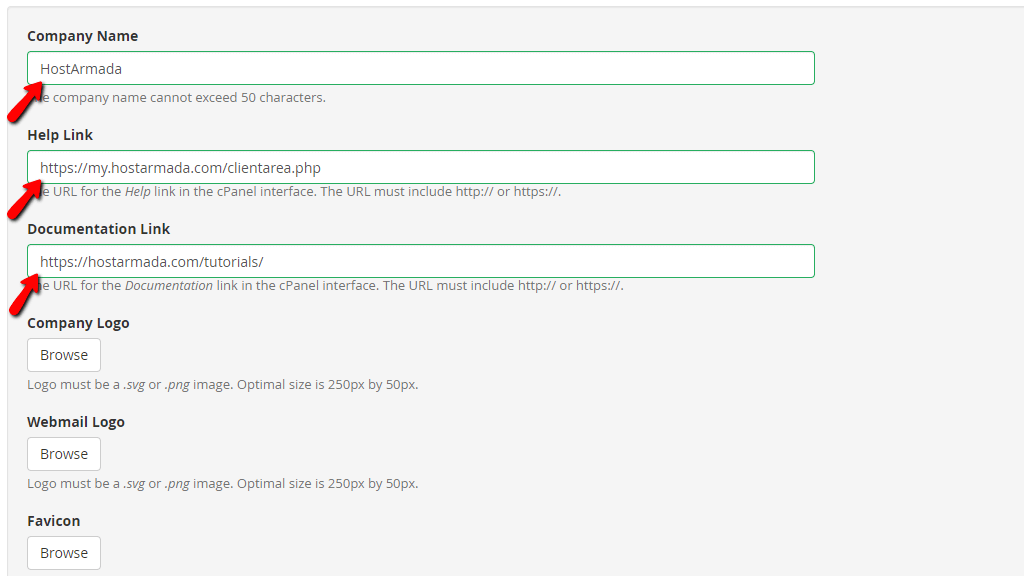
Below these text fields, you will find three buttons which are all named “Browse”. The functionalities associated with them will let you upload a “Company Logo”, a “Webmail Logo” and a “Favicon”. Please press the “Browse” button located underneath either of the above-mentioned labels in order to access your local folders and upload the desired logos.
One thing you need to note here. If you are uploading a company logo, there will be no need for you to type in the company name in the aforementioned text field, as the logo itself will be positioned where the default cPanel logo is within the control panel. To get a better understanding we will attach a screenshot displaying the location of this label inside the cPanel.
The second tab we are going to discuss is the “Customize Style” tab. In order to access the functionalities behind it, please press the “Customize Style” link located on the right side of the “Customize Branding” tab.

When you visit this tab, you will notice a search bar below the “Manage Styles” label. You may use it to filter out and find the cPanel style you would like to apply. By default, WHM will provide you with 4 options – the “Dark” style, the “Light” style, the “Basic” style, and finally, the “Retro” style. In order to apply a default style for all of the cPanel accounts you create, please click on the “Set as Default” blue link, which will be located on the bottom side of the section for each style above the “Download Style” link.
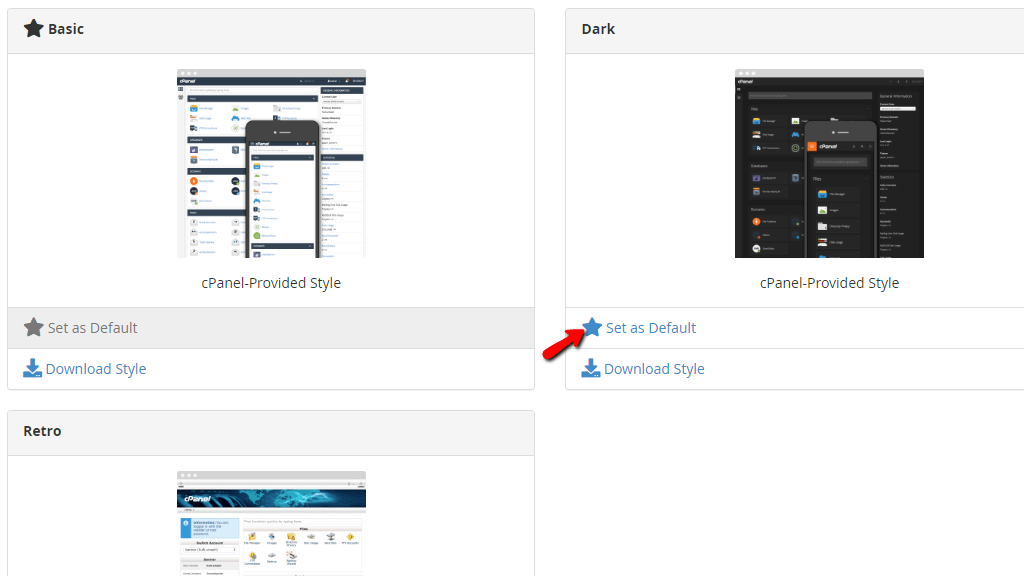
The “Download Style” link below the “Set as Default” link will download an archive containing the style’s files. If you are familiar with how to edit the files of the styles – you may change them and have a unique cPanel style for your clients. This takes us to the last functionality on this tab which is the “Upload a Style” button located on the top right side of the screen.

It will allow you to upload a style that you have customized yourself or a modified version of the currently available ones, which you downloaded and altered.
The last tab we are going to explore is the “Public Contact” tab. You may find this on the right side of the “Customize Style” tab. In order to access it, please press the “Public Contact” link.

The available options that you will notice are the “Public Company Name:” and “Public Contact URL:” text fields. We highly recommend filling in the requested text fields, otherwise, customers will see the default cPanel information, which may harm your brand. When this is configured the “Account Suspended” and “Default Webpage” pages will show visitors your contact information. Users will also see it when they search for your contact information online. To save the changes you did, please press the “Save” button underneath the “Public Contact URL:” field. If you want to clean out the text fields, please press the “Reset” button located on the right side of the “Save” button instead.

There you have it! The most important information about the “Customization” feature in the WHM control panel. Learning this functionality will help you brand your cPanel and have a really professional-looking Reseller business! If you have any questions in regards to this WHM feature, please contact our Technical Support Crew by submitting a ticket from your Client Area.


