Introduction #
It is obvious how fundamentally important it is to choose the perfect theme for your website. Considering the fact that visual appearance has a significant impact on your visitors and online recognition, you should invest time and effort in finding a theme that matches your business necessities best.
WordPress, being the most popular blogging platform, has its advantages. One of which unarguably is the huge number of available themes.
Now, the hard part, which is solely your prerogative is to select the theme. What comes after – installing and configuring the theme is quite a straightforward process, and we are going to step-by-step navigate you on it.
Getting Started #
Before we step into the actual process, there are a few details we would like to point out. First, there are a few general methods for installing new themes in WordPress based on the source they are obtained from. The official WordPress Theme Directory supports thousands of themes, but in some cases, the theme might be purchased from a third-party. For your convenience in this tutorial, we are going to review each method so that you are covered no matter what the case is.
Also, note that if you are changing the theme of a live website in production, it is highly recommended to enable the maintenance mode and create a backup copy just in case. There would certainly be major changes in the overall look and functionality of your website that you might want to check first before getting back online.
Now that we got it all covered let’s jump right to the process of installing a new theme.
To begin, we will need you to log into your WordPress Admin Dashboard. You can do that by accessing your domain followed by “/wp-admin“, i.e., “yourdomain.com/wp-admin“, where “yourdomain.com” stands for your actual domain name.
Once logged, please navigate through the left-hand side menu bar to Appearance > Themes.

Upon doing that, you will be redirected to the “Themes” section, where you will find a list of your installed themes. You might already be familiar with the interface if you have interacted with your WordPress themes before. Even if you are not, do not worry. It is pretty intuitive, and you should have absolutely no issues finding your way around.
The first step of installing a new theme, regardless of its source, is to click on the “Add New” button positioned at the top of the page.

Upon doing that, you will be redirected to a new page where you can start the installation process.
Installing Themes from the WordPress Directory #
WordPress allows you to install any theme available in the official WordPress Theme Directory directly through your Admin Dashboard. This is extremely convenient, and it simplifies the process as far as two mouse-clicks.
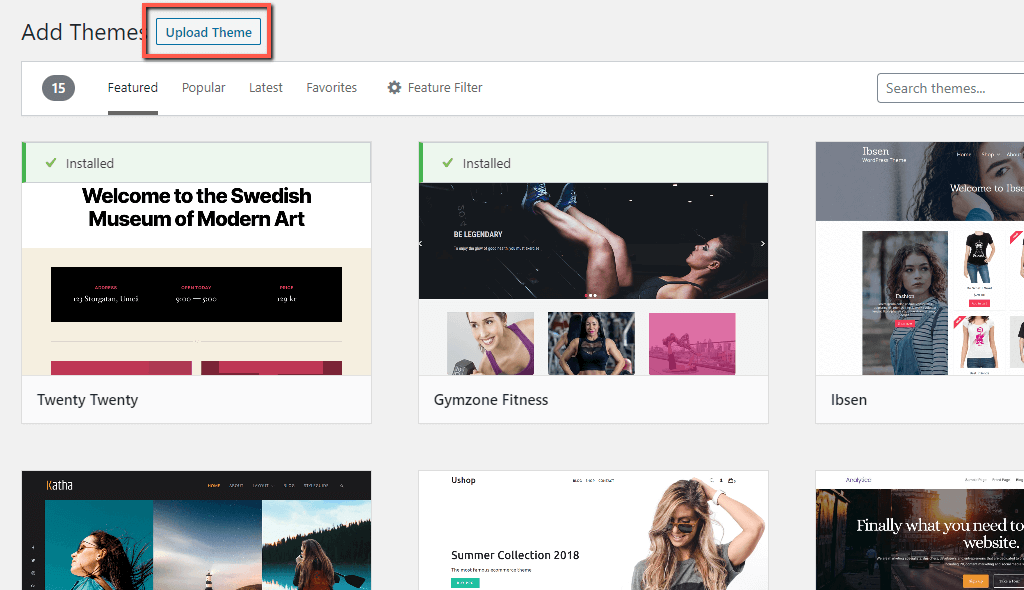
As you can see, you are able to browse the themes based on several categories, as well as to directly search for the theme based on a particular keyword.
As soon as you locate the desired theme, all you need to do is to hover over it and click on the “Install” button.

The theme installation process should not take longer than a few moments. Once it is installed, you will need to click on the “Activate” button. Please note that this action will replace your current theme. If you do not want to do it just yet, you can proceed with the theme activation anytime in the future.

Simple as that, you have managed to install a new theme in your WordPress based website.
Manually Installing Themes #
As we previously pointed, if you have purchased the theme from another source, you will be provided with the theme files.
In such a scenario, you will need to first upload the required archive file in order to proceed with the theme installation.
To do that, please click on the “Upload Theme” button positioned at the top of the page.

Then you will be presented with a new screen where you will need to click on the “Choose file” button, which will allow you to select and upload the theme archive file from your local computer.

As soon as the archive file is successfully uploaded, the file name will appear, and you will have to click on the “Install Now” button. This will initiate the installation of the theme, which will be successfully completed within a few moments.
After the successful theme installation, you are going to be presented with a new screen displaying three options. In order to activate your new theme, naturally, you have to click on the middle “Activate” button.

At this point, your theme should be successfully installed and activated.
Note that most paid themes require additional steps to be taken in order to register the theme itself. Considering the fact the process may vary for the particular theme, we can not provide you with relevant instructions. However, if you are experiencing difficulties, you can always rely on our Technical Support Team for further assistance.
As you can see, the installation process of a WordPress theme is pretty straightforward. We hope you have managed to complete it with ease.! In case you were not able to successfully installed the theme, you can always contact our Support specialist, who will gladly perform the needed installation on our behalf.


